-->

Thursday, March 29, 2018

Northwind, a tutorial


So I like traditional blocks! My sister found me this booklet at the local thrift store, known for its craft supplies, and when I was assigned my palette, and was thinking about what to do with it, I thought, it’s the perfect time to bring out Northwind!

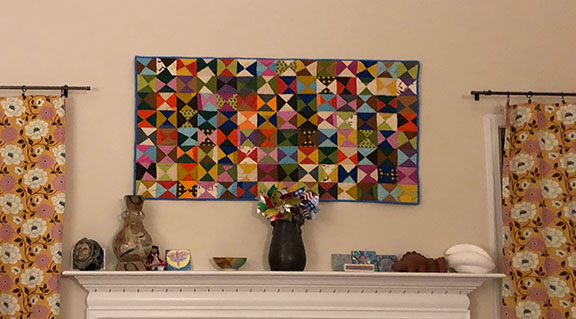
My finished mini! It's about 12 inches square, though not square.
So, the booklet (Northwind Quilts by Sharyn Squier Craig) does of course have instructions for making the block, but at a larger size (actually three sizes, 4.5, 6, and 7.5 inches and Quilter's Cache has a 12" block). My block finishes at 3.75” and it is a bit haphazard, so if you want an exact block where the points are perfect this may not be the tutorial for you. (Also the booklet has alternate pieced blocks and setting ideas, so I'm not saying don't look at the book. It certainly was my starting point! I just like to work small.)

Unpieced pieces verses finished block, please forgive the 80s color scheme!
For the large triangles I cut 3.75” squares of fabric with my 3” half square triangle die for my sizzix big shot - which is approximately equal to a 3 3/8" square bisected. And I used 2” squares, bisected, to make my small triangles. I just free cut them with scissors. This is where I suspect the wonkiness of the blocks come in. (Also I didn’t trim the complete block to be the same size. I just let it ride.)

NB- I find it easiest to lay the pieces out on a design board by my machine so I can keep track of which goes where.

Take three light triangle and pair them with three dark triangles to make the hst squares that run across the center of the block. Trim the ears and press.

Then, add to each a further little triangle. I don’t generally pin tiny seams, but I did with these, because when I skipped pinning I occasionally sewed the triangle to the wrong side. Trim the ears and press.

 Add the last leg to the triangle you are forming for the center of the block, trim ears and press.

 It will look like this.

 Assemble all the subunits into a line of alternating triangles, trim ears and press. This is a pretty fun shape with possiblities of it's own. Something to think about later, I guess.

Once the center is together, you attach your larger triangles to the sides, trim ears if necessary. Trim the blocks to size if you want. I assembled mine on point, so I made a few blocks that were not complete blocks to fill out the design. Then I quilted it with some walking foot straight lines.

And because I didn’t want to lose too much of the blocks which admittedly were not lined up well, I didn’t trim it square but in a more organic way in order to preserve a few extra points which would otherwise be lost. Putting the binding on was a bit awkward this way, and a bias binding would probably be recommended.

Sigh.
For the record, my color palette for this challenge was pink, grey, black, and pale blue. Not something I would have put together myself!

Thursday, March 15, 2018

At the Retreat!

Recently, one of the guilds I belong to, the Ann Arbor Modern Quilt Guild, held its winter retreat at Howell Nature Center. Our winter retreat has been in January for as long as we’ve had them, and I petitioned the board to change them to spring, mostly because, we do live in Michigan and at least one or two of these winter retreats had to be disbanded early so that members could get home before a blizzard arrived.

Of course, we had a blizzard in March this year, the day before we were heading out, but as bad as the roads were Thursday night, and they were really bad, most of that was melted by Friday afternoon. And it also melted out of the trees onto the roads and our cars like someone was tossing rocks, but anyway.

The view from my machine.
The view from the large room was lovely, the facility itself was called Lakeview! And the food was provided by the staff there, brought to our cabin, so we didn’t have to do anything or wander offsite at all. It was all very nice. Although not very restful, as I was the last person to bed each night, and while maybe not the earliest riser, I was not the last one to sleep in either. But chocolate keeps me sewing, and who needs sleep when you can sew all night?

I finished piecing the blocks for that endless doublewrench quilt. I have been working on it since at least the summer.

A selection of blocks. I'm using mostly S.S. Bluebird from Cotton + Steel
 I finished piecing the blocks for this Irish chain quilt (not pictured) that I am working on for my monthly charity quilting group (which hadn’t met for months because of blizzards, speaking of blizzards!). 

On Point looks awesome but hurts the brain.
 I put together this random color experiment, which I created months ago out of the leftovers from the hourglass mini miniquilt I made for a guild challenge last summer. It needs a border. One day....

Sample of the color palette challenge. Though not my colors.
 I pieced a miniquilt top for the upcoming guild challenge, which I will share later. It’s a color challenge, we drew a color palette from a bag and have to use those colors (and maybe a neutral if you don’t have one) to make a quilt of any size. 

So, I have a theory about optimal scrap distribution...
And on the last morning, I put some work into the scrap quilt I started in Amanda Jean’s class with our guild in October. 

I did not work on the bag I meant to make at the retreat, but I think I got to everything else.

Since coming home, I still haven’t made that bag. It sits in a pile glaring at me. But I quilted and bound my challenge mini, I got the Irish chain blocks into a top (still need to make a back for that), and I have continued to work on the Amanda Jean quilt, Ring Me. And I smooshed all my Doublewrench blocks into a drawer, because I can't face another on point project right now.

A view of said drawer.

Thursday, March 8, 2018

Improv Hourglass Wallhanging


In quilting, I am most interested in traditional blocks, and using them as a template to explore repeating patterns, using simple patterns and altering it as it repeats, mostly by changing colors within the block. I love lots of color! You may have noticed.


For this quilt, I was very inspired by Sujata Shah’s book, CulturalFusion Quilts, which uses improv on a small scale to make traditional blocks in a looser way. A woman in one of the guilds I belong to had brought in an improved hourglass mini quilt, also referencing Sujata's book (she'd taught a class at our guild last year) which was quite striking, though hers was more monochromatic than mine.

The center fabric in this log cabin is the Dear Stella print I used as my starting point.
I started with a fabric (the maple seed print from Dear Stella, and I used it to make dining room curtains at our previous house) and chose colors that either matched the colors in the fabric, or were similar to those. Then I added a few browns, because my living room is red, mustard yellow, and brown, and I knew where it was going to hang. Then, looking at the brown and the green, I thought, hey, Oh Deer, by Momo, has that green and brown! So I added in the deer and the dot in that color scheme (I thought the scale of the bird would be too big to be included.)


From these, I cut many 6 inch blocks, 4-6 per color, plus and occasional 6x7 inch rectangle. I think every 4th or 5th piece was a rectangle. Of course, I did not take notes on my process.

I paired the rectangles, generally with a piece of a similar color or tone, and sliced off some amount perpendicular the long side at a random angle. Then I swapped those pieces, and sewed them back together, and placed these back with the squares, so that some pieces already had two colors. Then I put them in groups of five, and cut them in a rough hourglass, then assembled 4 or 5 blocks from the pieces. Not every combination got in, some were consigned to the scrap pile.

Three of these hourglasses were made with those two color rectangles

Once I had made all the blocks and counted them, I realized I didn’t have enough, and to make the last twelve I dug some pieces out of the scrap pile, but also this is where a few random colors came in, the pale pink, that neon orange, the gray, and the black, because instead of going back to my original fabrics, I just used what I could find in the scrap bin.


 Then I trimmed down all the blocks, and it wasn’t very random, since mostly I looked at where I could position the 4.5 inch square that would keep the diagonal seams out of the corners of the block. 

Then my kids and I laid them out in the front hall and crawled all over it to assess the look. I am pretty happy to use the front hall as my design floor, because I can lean out over the staircase and get a farther away view of whatever I lay out there. 


They were laid out on design boards, 9 per board, and I labeled the boards in a grid (numbers for columns and letters for rows) but while I was assembling those blocks, I came to the conclusion that I must have mislabeled something. Then it was just making it work. But despite it probably not being the optimal layout of the blocks, I think it looks great in its spot.


I realize I didn't mention the quilting! I did fmq it, fairly loosely on most blocks.