-->

Sunday, June 28, 2015

The warped double wedding ring quilt(s)


Well, I had this grand plan about putting both quilts into one post, because they were made practically together, but I seem to have lost the photos of one of them, and as neither of them is currently residing with me, I sadly, must present an incomplete post!

I had been thinking about double wedding rings since I saw Victoria Findlay Wolfe's curve piecing demonstration at QuiltCon 2015. And my partner for the Cotton + Steel swap had a lot of mini quilts, and I was looking for an idea for something that would be very different from anything she'd received before. I had already downloaded this pattern, and I don't know why I decided that wasn't hard or different enough... But it wasn't.


So, I imported a picture of a double wedding ring block into Illustrator and traced the shapes, then duplicated them until I had the number of rings I wanted, then used the warp tool to shift them around until it became a shape altered enough to look odd, but not so difficult to piece. Then I broke them into pieces, and added a 0.25" seam allowance using Daisy's tutorial on Ants to Sugar, and had a friend of mine with a 36" printer print them out.

No two pieces being alike, and making two quilts at once, I would cut out the five pieces for each peel unit at a time, then assemble it, before moving on to the next peel.


And it was not as bad as I expected to assemble, although the piecing looks more complex than a drunkard's path quilt, it's much more forgiving, because they are shallower curves.

At the end of the piecing, I had two quilts, one I had to finish up and send off to Quilt Market quickly, and maybe never took pictures of, using Brenda Ratliff's Pie Making Day fabric, and one for my Cotton + Steel swap partner, using Cotton + Steel fabrics.


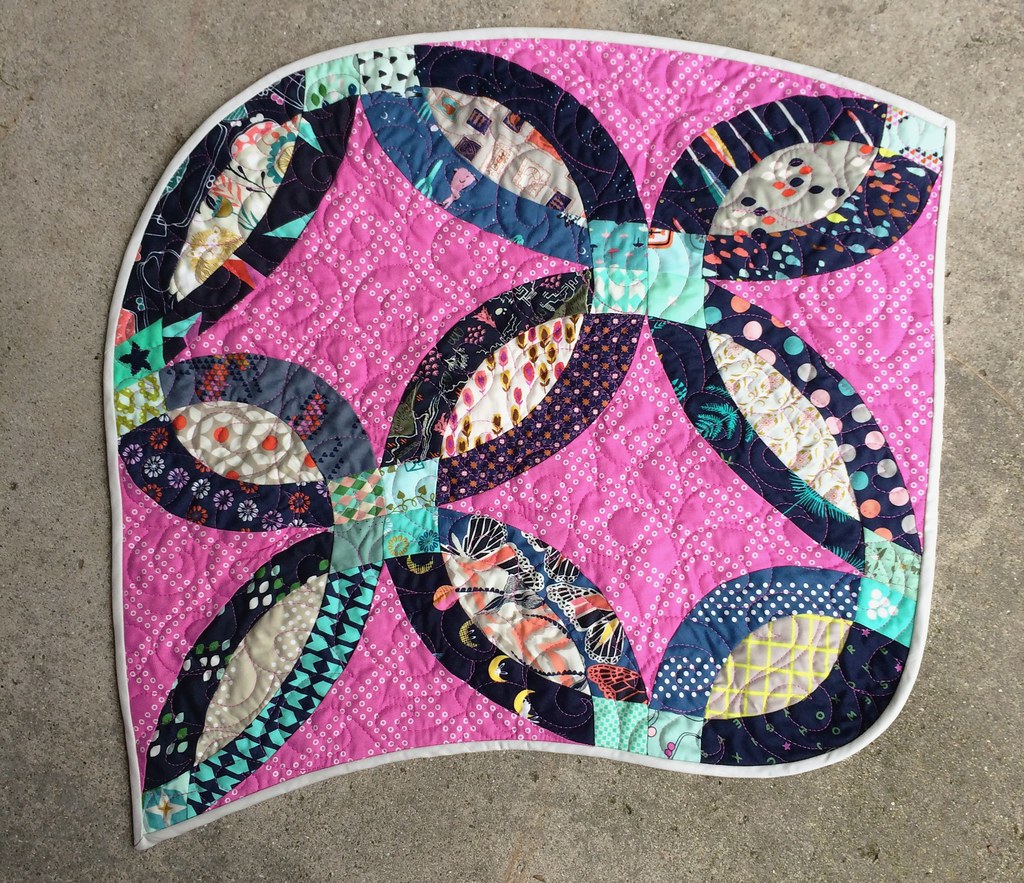
I did some cute swirls for the quilting, in a pink thread that matched the background. I used a very light gray for the binding, a little bit of quiet on a busy quilt.


The back was assembled from scraps from my other Cotton + Steel project, which I hoped will be done eventually. (Sigh, the less we talk about that the better!)

This is the best picture I have of the other one, though it's all clips and unburied threads! I invented a new free motion quilting pattern to quilt it's background, interlocking rings! and did specific patterns in the pieces rather than my usual overall quilting. I have to say... although I think it's amazing when others do this, I'm more inclined to stick with single pattern quilting, because it's easier and I'm essentially lazy. But, it's good to try new things just to figure that sort of thing out.

A photo posted by Amy Given Sewist (@blotchandthrum) on


But if you're asking for a pattern, I don't think one is forthcoming! I did save all my pattern pieces, I think I may make another if I can think of something more exciting to do with the pattern.

Post with that quilt's proper picture is here.

Sunday, June 21, 2015

Fold Over Sewing Pouch

My chapter of the Modern Quilt Guild, the Ann Arbor Modern Quilt Guild, is having a tiny piecing swap. Which means, as long as you include some tiny patchwork, you can make whatever you like, and we'll do a yankee swap to exchange items.

First I started by looking through this giant book of quilt blocks for inspiration, because I had been making a lot of stars recently for another swap and thought I should branch out.


(The stars are based on a pattern from Lynn Harris's book, Every Last Piece, which is amazing, beautiful, and thought provoking about some things I tend not to think about, scraps and stash. This particular star is *gasp* even smaller than the tiny stars in her quilt...)

And yet I didn't want anything too complicated, because, well, tiny!, so I ended up doing a fairly simple Seminole Patchwork style block with the two tiny bits of Lighthearted I had and three solid fabrics. Seminole patchwork is a way to make multiple intricate and repeating blocks using strip pieces, recut and positions and cut again. Elaine who blogs and instagrams at/as Messygoat has a good tutorial and overview if you're interested. (Also, you should check her out because she's amazing.)

I started with 1.25" strips cut from fat eights, four of the navy polka dot, four of a pink solid (bubblegum in cotton couture), and one of the floral, and sewed them in groups of three. Two polka dot - pink - polka dot, and one pink - floral - pink. Then I cut them into 1.25" units and reassembled them into checkerboards. Then I bisected a number of 3" grey squares, sewed them on the checkerboards and cut them down to size:


I ended up with five blocks at 3.75" unfinished, and saving two for the interior, I added some navy and pink (using the leftover Lori Holt bee print from this skirt) stripes to stretch the three blocks out, and then strips of floral and solid (because I measured the floral badly... Sigh).


And then I had the cover for a Fold Over Sewing Pouch, a cute pattern by Aneela Hoey. And one I'd made before, though this time I followed the whole pattern and added the pincushion and the needle book.


The inside needed to be pink. Obviously! But... here's the thing, I don't actually own a lot of fabric that is pink. But what I do own a lot of is Tula Pink Fabric! And wouldn't you know, the pink fabrics from Birds and the Bees is just the right pink!


So, it kind of got this amazingly expensive Tula Pink interior, which is hilarious. Plus I pieced the squirrel in upside down, and then used fusible fleece rather than batting, meaning I wast stuck with it, so I had to invert the positioning of the interior in order to make it appear right side up. Though the zipper then became upside down. But anyway! I would rather have someone use and enjoy this bit of highly desirable fabric in a sweet little sewing kit, than let it sit forever on the shelf (and it would be unthinkable to sell it!). And it's much more exciting as a thing than as a potential thing, isn't it?

Now I'll wrap it up for the meeting! Can't wait to see what everyone's made!

Sunday, June 14, 2015

More sewing for kids

I have made several more shorts for my older child. I've been considering why I do this, it's not either political or a sacrifice for love. Though it is rewarding to make things that the child will wear - I did spend rather long making adorable things that stayed dormant in closets before realizing one has to cater to the interests of the recipient. I have to admit, I enjoy it. I don't tend to do things I don't enjoy.

Now I stick to fabrics and patterns I'm pretty sure are acceptable, like these oxford shorts.

It's maybe part necessity, it's hard to find things that match up to my exacting standards for clothing without spending a lot of time on it (I mean, the last time I went to the mall to get clothes for a girl, I left without buying a thing because it was either horrible - glitter and cropped and, well, trashy or synthetic), as well as the child's preferences. Sometimes that overlap is tiny. And it's partly that I enjoy shopping for fabric more than I enjoy shopping for clothing. Also, when I make things I get to control, well, everything.

I can have an idea:


And at the end of the week have a garment:


Using fabric the child selected! (This is based on the shaping of the Oliver and S sailboat skirt, and the front is faced in a similar manner as that skirt. The back is the Sailboat back exactly as written in the pattern.) The buttons are, as with the last version of this skirt I made, not functional.

And I'm also fiddling with pocket shape! This new wave of shorts have a much more subtle pocket shape than last year's versions. It's maybe not super exciting to anyone else, but these nuances and challenges keep it fun for me.

Or if some event the child is involved in requires clothes which may not be worn again, I can make shorts using 3/4 of a yard of $10/yard twills and create clothes that are comfortable, 100% cotton, well made (seam finished within an inch of their lives), and relatively inexpensive (though one does have to put time into it). With a personal touch of designer fabric that I love.

For instance white shorts:


And navy:


Although I did not use Hampton Twill on this one, I used something heavier, which is why I faced the waistband to limit the bulk (as suggested by Pam, one of my fellow A2 MQG members, who suggested it when I was expressing doubts about using the fabric on Instagram!)

Also, it's just fun. And unlike quilts, they are relatively quick to come together. Which is a reward in itself. And I have a few more new shorts planned. As well as dresses. Fabric is washing now!

Sunday, June 7, 2015

The Skirts of Summer

I made some skirts for some kids!

The first one is a sailboat skirt from an Oliver + S pattern. Although I made it in a metallic fabric that I loath (it's so stiff with that sparkle! so weird, and gets super hot under the iron) I admit that it turned out really cute:


I was puzzled when those pocket-like areas turned out not to be pockets. And those buttons are supposed to be functional! Well, they're not in mine. I just sewed them on through all the layers. It just seemed like a lot of unnecessary fuss. Those buttons came from an amazing fuzzy sweater I once bought on a trip, but when I came back from my trip all that fuzz had transferred itself to everything in the bag, so I save the buttons and ditched the sweater. I've been waiting a long time for a project to use them on!


The back has this cute little pleat detail.

It was a fun pattern, and easy to follow. I'm not certain if I'll avail myself of the shirt and pants that are also included. We'll see. I really like the look of this skirt. I'd like one for me, though not in metallic star fabric.

Then I made a Made to Measure skirt for another child using some Cotton and Steel Lawn (most of which Pink Castle has on sale right now)...


I used the same fabric for the pockets as in the last skirt because it was hanging around and I was too lazy to hunt for something else. I love this pattern, because it's easy to do (just pockets and rectangles gathered in a waistband) and it always looks great, though I should have reviewed the directions about which side of the waistband gets the interfacing, pretty sure it should have been the other one! But, it's together, and washed and looks fine. I really like the feel of that lawn! If I could ever manage to make something for myself, I might have to get some for me.

Monday, June 1, 2015

The Importance of Good Seam Finishing in Garment Construction

Or alternately titled, things it would have been good to know Yesterday. (Or, actually, Friday!)

I've been making summer shorts for my kid, starting on Thursday by cutting them out, and it's only just now been warm enough for shorts (Michigan!) so last year's have only just appeared in the laundry this weekend.

And whoops, I have clearly made some mistakes in seam finishing!


The two pairs of oxford shorts (I can't speak highly enough about oxford, it is soft and thick (well, thicker than quilting cotton, but not as thick as denim, just a great midweight fabric) and perfect for shorts and structured skirts. And it's usually in fun and cute patterns) which I just finished the seams of by pinking them are in shreds. I'm hoping there is enough left of the seam allowance that I can serge over the edges...

The worst is the penguin mini skirt, which has no seam allowance left. This thing has been washed maybe three times! I've only worn it... three times...


If it wasn't a thing I had grave doubts about wearing, I might be more heartbroken. However, I think there is enough usable fabric left that I can recycle it into a pair of kid shorts. (When you have a hammer, every problem looks like a nail, right?)

Not that pinking doesn't have its place. It works well enough on the Monoluna fabric that I used for the pocket in this skirt. It worked well enough on these quilting cotton Tula Pink ladybug shorts:


I think pinking, to be effective as a fray reducing measure, requires a certain amount of threads per inch, and oxford just has too few. And much like linen, denim, or twill (well, denim usually is a twill, but anyway), oxford requires more firm treatment. Like using a serger to hold the fabric in place.


Sadly, this was my first pair! Why, why, oh why, did I not carry on with the serging?

The pair I finished on Sunday was a super fraying twill (I do wash these without treating their edges -either by serging or by using a zigzag stitch as suggested- because I'm a rebel, but this got navy blue fuzzy things on everything that was in the wash with it), and for that pair, I was supermindful of the seams:


The seams were individually serged, and those edges turned under, and top stitched in place. For the other pair of twill shorts, which I was less concerned over, I only serged the seams. If you don't have a serger, a zigzag stitch will work just as well for holding fabric in place through washings. It's like keeping soil from eroding by encouraging plants with dense roots to grow.

Anyway, lesson learned. I wrote a large note on my pattern for shorts that oxfords must be serger at the seams, and hopefully writing this post will sear that into my distracted brain. I'm off to try and salvage what I can of the shorts I made so thoughtlessly, and even if they can't be saved, I have a fun pile of new oxfords from Pink Castle to make into new shorts if need be:


The foxes are so amazing, right? I actually bought those in two of the colors...