-->

Friday, December 30, 2011

Christmas crafting, part 3: patchwork bag

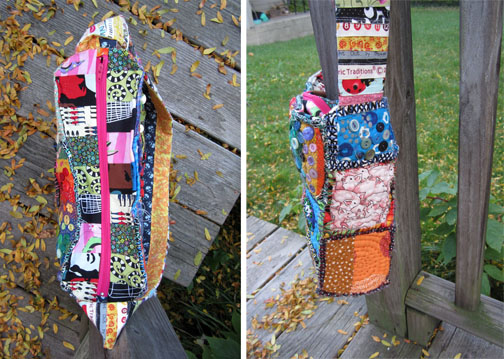
patchwork bag
in my favorite quilting pattern - the log cabin
The outside is all hand-dyed fabrics - the red is leftover from this skirt.
inside the bag
lining and (tiny) pocket

Sadly, the pictures aren't great - there really is no big wrinkle at the top - but I sent this out, and these are the only pictures I have. I really liked how it turned out. And this print works really well with all the colors in the patchwork. And best yet, it was all stash, except the handles.

Monday, December 26, 2011

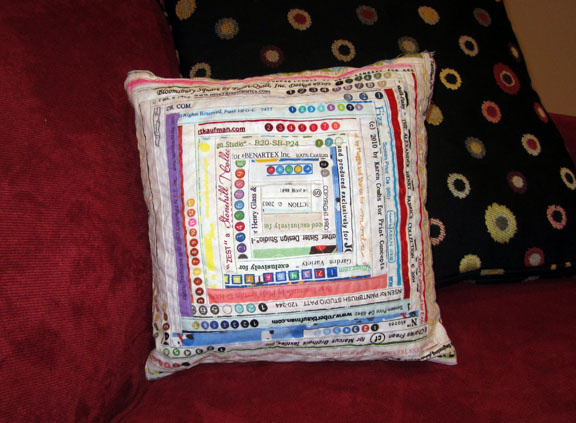
Selvage edge pillow

It's unusual for me to start and finish a project in under a week - but this one I started on Christmas Eve Eve and finished today! And I'm excited, so I'm rushing to share it.

selvage edge pillow
the front is pieced log cabin style


pillow back
the back is different styles... The center stripe is leftover from my rainbow bag.

Look! My first buttonholes on a machine I've owned for over six years! They're super easy, it turns out... and I made them too big, because my test buttonholes were too small. Well, whatever, it's the back.

There's always something to look at with this pillow. It's somewhat hypnotic.

I also used metallic thread to sew the pieces together, and it was a pain. It would break, or squiggle out of the thread take up lever, and then get stuck in the bobbin underneath... and many other unpleasant things. I would swear never to use it again, but I have another spool of it, in a yummy turquoise which despite the pain it is may prove irresistible.

Saturday, December 24, 2011

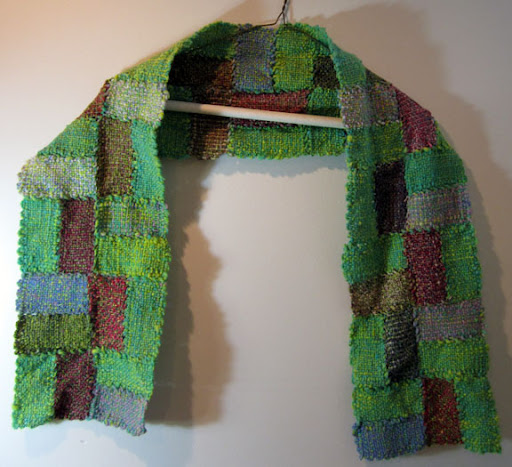
50 for 2011: #27 - Weavette scarf

This has been in the works for awhile, at least six months, though I'd been planning to do it for even longer. It became one of my car projects - something to grab when I was a passenger, which isn't very often, frankly.

The first rectangles were posted about here. The rest were never mentioned.

weavette scarf
please excuse the strangely dramatic lighting

So, the green and yellow yarn was intentional. The remaining ply was plied with leftover purple yarn, and thus we have half green, half purple rectangles, which I love. It looks a little weird, but I love it, and it's so thin and wide and warm! The matte rectangles are merino, the shiny ones are a merino/silk blend.

I used a 2x4 inch weavette, and I'll have to say while stitching them together took less time than I imagined, weaving in the ends took much much more. I had 52 rectangles - each with at least two ends (104) and a few with knots in the middle where yarn had run out and new yarn was attached. Also, when sewing them together, a few didn't have long enough tails and new yarn had to be used, so... so, so. It ended up taking four hours to go from done to Done.

I love it, I do, but I'm not sure I'll be making another one, at least not in the foreseeable future (after all, there is quilting to do!) But an interesting project, nonetheless.

Thursday, December 22, 2011

Christmas crafting, part 2: red, red, red

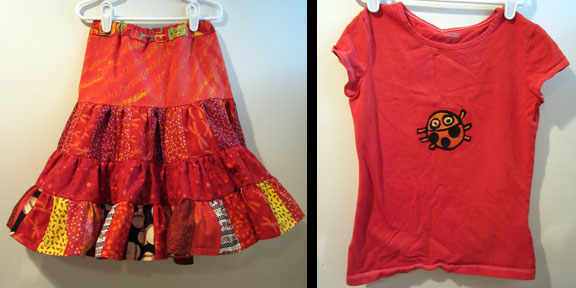
For the elder daughter. This was an intense project! Actually, it was two projects, one not so intense - the fairly straight forward three dye baths and wax resists that made up the t-shirt.... and the weeping, cursing inducing trouble that was the skirt.

red shirt, red skirt
She will look at this and regret that she has no red socks to match.

The fabric on the skirt's upper layer was hand dyed with thread resists - also three color dyed - the same three colors as the shirt, I'm almost sure. But, whatever, let's talk about construction!

I started off with McCall's M5841, which is darling. But I tinkered. First of all, I made layer one longer, and added a contrasting waistband, which maybe is too distracting. Maybe?

I made layer three a solid color, and widened it. Otherwise, I cut down the width of every layer by nearly a third. The bottom layer is supposed to be 17 width of fabric strips sewn together, then cut into 8 pieces and then sewn together into a giant loop - mine, by contrast is 12, cut into 7.

Still, an immense undertaking. I am grateful to the existence of the serger, because while cutting out thirty pieces is easy, the enormity of the task of finishing the resulting seams was keeping me up nights...

I took the extra steps of finishing seams first, and then sewing them together on the proper machine - at least when attaching the layers - this did add a step, but it also made fixing mistakes (and oh, there were many!) easier. The long rows of strips, however, were put together on the serger.

I am also glad that I hemmed the last section before attaching it, because I am often a great procrastinator on hems. And at the last minute, I threw in a lining, so all the layers and seams wouldn't make it too uncomfortable to wear.

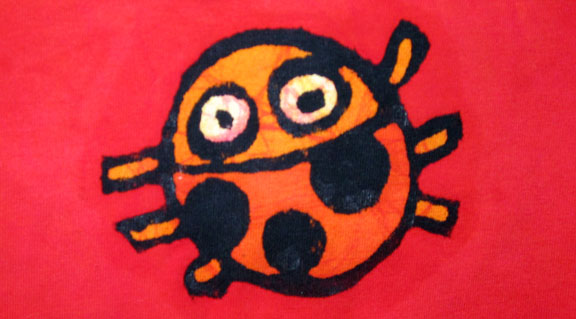
And finally, here's a close up of the ladybug:

ladybug
maybe a bit out of focus?

Monday, December 19, 2011

Crafts of the Past - Christmas Edition

Every year these things turn up, and every year I wonder why I haven't gotten rid of them yet. They are actually finger puppets, but ended up stashed with the ornaments. Anyway, my sisters in particular find them hilarious.

santa and christmas tree
Merry Christmas...?
I think Santa's crooked mustache probably has a lot to do with that.
These were made when I was first knitting, that first time, knitting 1.0, when I was still in grade school. I knew how to cast on, and how to increase and decrease and how to bind off, and that was it. These are knit flat decreasing on the front, and then at the top, I just started increasing, and leaving holes as I did so, because I didn't know about the "twist the stitch you pick up" trick. (In effect, the increases I did here are just yarn overs done in the following row... if that makes sense?) Then seamed up the two sides, though not properly, because I hadn't been taught that yet.

It wasn't until I relearned knitting in college that I learned how to knit in the round... now that's pretty much the only kind of knitting I do. The third time around, 8 years ago or so, I learned shaping and cables and how to read patterns - mostly teaching myself from books - it's easier to relearn than learn it, I think.

And yet, looking back on my early primitive acrylic efforts, I'm kind of in awe, not of my technique, of course, but of my bravado. I would not attempt some of those things now, or certainly not designed in the manner I did then, I wouldn't mix fiber types or yarn weights so wildly as I once did, or start projects I'm not certain will work out, and I wonder if that's because of experience, or increasing hesitancy to take risks that comes with getting older, or a general crush for time I didn't have when I was young.

And I kind of miss it, whatever it was that drove me to make these strange little things.

Uh, right... Merry Christmas, everybody!

Wednesday, December 14, 2011

Christmas crafting, part 1: doll quilt

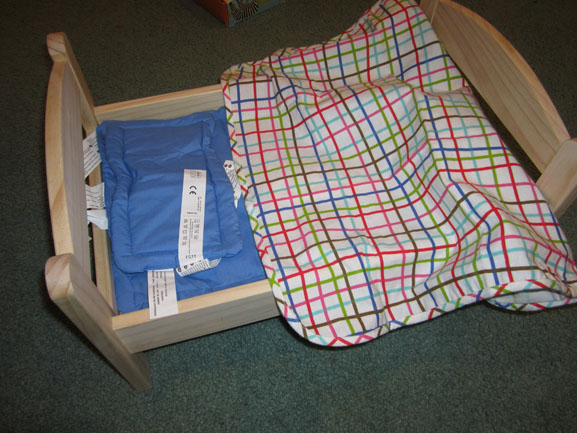
We purchased an IKEA doll bed for my younger daughter. Here is what you get in the box, once assembled:

IKEA doll bed
uh, what?

Some sort of flat blue thing that must be a mattress but looks more like a comforter, and some flat blue thing whose size suggests it's meant to be a pillow. And a sheet, which I quite like.

So, then I got to work.

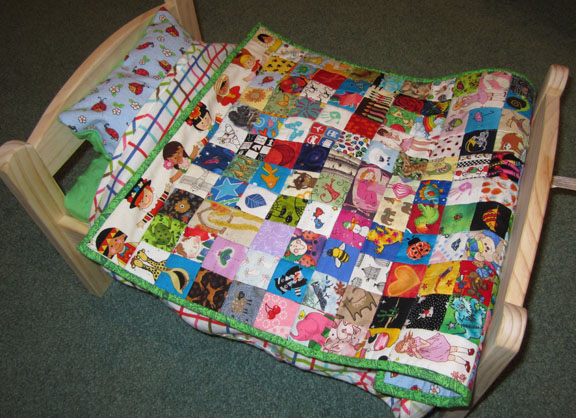
improved IKEA bed
much better!

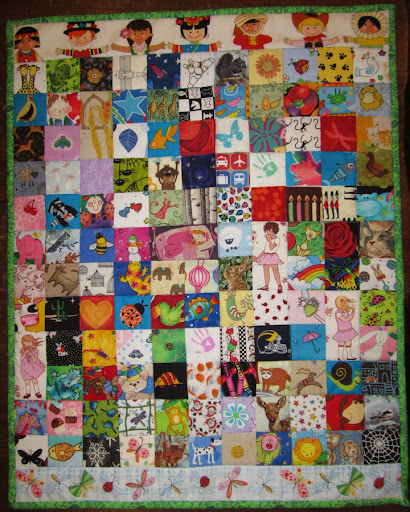
So, I went off to the craft store and bought two inch thick foam for a mattress, and covered that with minky. (Oh, minky!) In addition, I made a proper pillow, and a little I-spy type quilt. Actually, trying it out just now to take the picture, the quilt fits better on the bed sideways... huh.

doll quilt
and the quilt!

I'd like to thank my friends and relatives who responded to my call for scraps - it's 110 squares, and that upper border was also donated - and I couldn't have done it without the help!

Thursday, December 8, 2011

Crafts of the Past: little yellow bird

I think this is actually kind of awesome. My parents are cleaning out their house, which means boxes of things that I had long ago abandoned are now on their way to me. Mostly books.

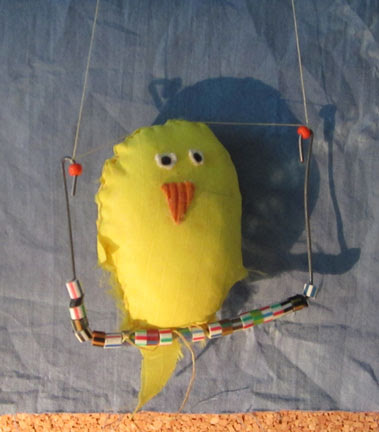
But, among the books are a few other things - one of which is this.

bird on  a perch
I think the perch may be the handle of a chinese takeout box
What strikes me as clever is the way the bird is held upright - the thread that also holds the perch being strung through his head. I mean, clever for a preteen...

Monday, December 5, 2011

Running out of room

Here's the state of affairs, I have four piles of fabrics: The big box of cotton prints, the small scrap box, the hand dyed stuff, and the pile of selvage edges. Actually, there are more piles - a pile of felt, a pile of fake fur, a pile of denim, a pile of fabric for dyeing, and a pile of non-cotton and/or non-quilting fabrics... but, for now, let's just focus on the cotton quilting fabrics, right?

selvage
I keep my selvage edges in this bucket!

scrap box
my scrap box; two months ago it could be closed

Scraps being anything an 1/8 of a yard or less.

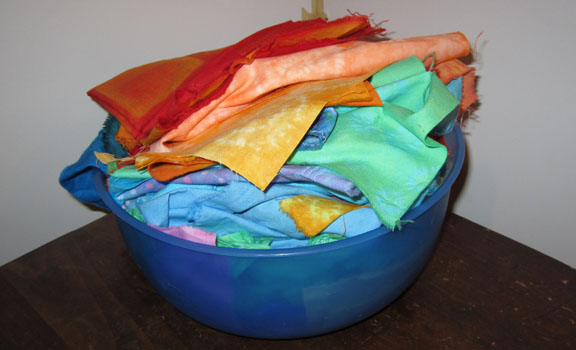
hand-dyed fabrics
and if I dye one more thing... I'll have outgrown this bowl.

Who stores things in a bowl? seriously. Except, I've got at least two other bowls employed as long term craft supply storage solutions.

fabric stash
and once, this box wasn't overflowing, either.
Sigh. I do have a shelving unit where all this fabric is supposed to go, but that is another story.

Anyway. I've taken some steps - I've moved the selvage strips into the scrap box, and the scraps and the hand dyed fabric now live in file boxes by my sewing machine. Though, I'm trying to work out a way to bring them back to the cutting area.... At the very least, I've freed up a bowl!

Tuesday, November 29, 2011

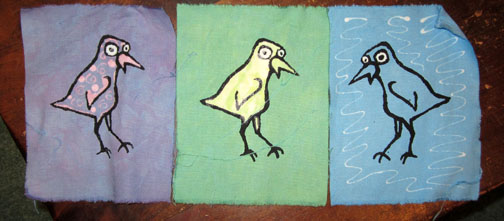
The birds, in the end

So, these birds, you can see them in the early stages here. And after weeks of dyeing:

birds
batik birds!

As with any picture taken in my basement (sorry, but it's raining today!) the color is not right. That top left one is red. The one next to it, imagine as a warm chocolate brown, rather than icky bluish grey.  And so on.

Although the wax is mostly out, there is still enough to make them stiff. Especially the four or five where the background was also waxed.  I expect there will soon be another round of washing out to do.

By and large I'm fairly pleased with them, so I don't know now which ones will go in the quilt and which ones will sit that out.  And I don't plan to start on that project till after Christmas (or at least, after Christmas presents are complete, which may end up being the same thing (though, I hope not!)).

You may have noticed, if you were looking closely at the photo, a strange thing - a phantom bird or two (or three!)

phantom bird
spooky!

I'm not at all sure where these came from - they are an exclusive feature of those birds with waxed backgrounds - though not every waxed background has it. I think that when I waxed the first one - I did it on a piece of glossy cardboard - something remained on the cardboard or didn't remain? And when I waxed the rest on the same piece of cardboard - this results? I don't know. I also don't know if this is something that is permanent or if when the wax is truly out, it will vanish as well.

Alright, back to work!

Sunday, November 20, 2011

Random notes from a busy life

Hey! So... yeah. I feel like I have a ton of stuff on my plate. Also a cat in my lap who is not helping me write this blog post...

I've continued dyeing like a fiend. I've three more dye baths in the plans, then I'm done for the year... I think. The washing out of wax and dye will then commence, and that will be an immense undertaking in itself, which is why I need a dye hiatus; otherwise, I'd just keep holding the to be washed pile for the next dye bath indefinitely. Sadly, this means that most likely none of the shirts I've been working on will likely be ready for the next sale I have - which is the Black Sheep Weavers Guild sale, Friday and Saturday, December 2 &3 in Hartland, MI. However, I still have neat stuff in my inventory ready to go for that sale, so don't let me discourage you from going.

Tomorrow I'm taking a quilting class! My first! I am hoping to learn some secrets, to be initiated into the mystic knowledge of quilting.  I've been doing alright on my own (I think) but I firmly believe in learning things from people who know that they are doing. I'm pretty excited about it, even as my sewing machine is in the shop, and I've had to borrow one from a friend. It's older than I am, and just about as heavy as a thing can be that I can still pick up in one hand, but it's actually fun to sew on, unlike mine which, at 6 years old, has no apparent personality.

And Christmas presents are in progress - and three are finished, but I can't show pictures due to secrecy! However, when the girls' presents are ready, I'll show them off, as I am certain they don't follow my blog.  One is in a million pieces, and the other is in only a few pieces, but one of those is in the dyeing queue.

So, these are my excuses as to why I have nothing to show.

Except I do! I found this at the local thrift store:

swirly fabric
and 2.5 yards of this, as well!

Two and a half yards is like enough for a dress for a grown up! Or matching dresses for the girls! Although,  I'm not going to do that. I have serious quilting aspirations for this print.

Tuesday, November 15, 2011

Nothing but a brief reflection on LYSs I have known

When I lived in Urbana, Illinois, we had the best yarn shop. It was just down the street a few blocks from my house, a little ways from the library, and across the street from both an organic food store and my mechanic, so, I would, of course try to schedule my car maintenance with the yarn shop's hours in mind.

Because it was cozy! It was in a converted house, and there was a living room full of yarn to keep a person company. And unlike many yarn stores, it was young, the staff was young, the woman who owned it was extremely sweet, even when my child was destroying her display racks.

And best of all, it was totally on my way home from work!

There isn't such an ideal store here, and nothing so conveniently located. The store I go to these days is in a strip mall, and I don't know who the owner is.  And I don't have time to hang out, either. But what I do appreciate about it, apart from the bucket of toys - always the mark of a good store in my book - is that someone there has a very interesting eye for color. And every time I go there, there is something amazing to fawn over. Usually I manage to resist, but today, I could not.

mill end yarn
Isn't this amazing? It's just labeled "mill end yarn.

And then the next time I go, the amazing things of the last visit are gone, and a fresh amazing thing appears.

And if you are wondering about my resolution not to buy yarn this year - I think that this is only the third skein I have purchased in the whole year of 2011, so I think that's pretty good? Though, there are six weeks left...

Thursday, November 10, 2011

Recent adventures in fabric dyeing

I've been suddenly busy, I'm not sure why, but I've done 4 dye baths in the last 5 days.

Part of it may be the desire to get this bird quilt off my desk, as it is currently just clutter. It started out with one bird print I bought several years ago to make a bag with, and then my mother gave me some bird scraps, and I thought the two birds looked pretty good together, and I went out in search of more. But I can't very well make a quilt with a bird theme without employing my own birds, can I?

So, I printed up 12 birds, and off we go: 4 dyed blue, 4 dyed yellow, 4 dyed pink... and then the wax and the over-dyeing begins.

birds
pink, yellow, and blue...

And green is blue over yellow, and orange is yellow over pink.

more birds
and purple is blue over pink...

I'm not sure I'm going to use 12 birds, I'll just pick favorites at the end. I'm trying to get up the courage to run the risk of ruining them, because I've come to realize that I've been playing it far too safe. It's just fabric, right? If four or five come out nice, that's pretty much perfect for my purposes.

You can also see in these evidence of experimentation with a tjanting - my new exciting acquisition. I'm not entirely clear on how best to use it, and how to set it down without spilling wax all over, either, but it's neat, nevertheless. Fine lines! Whoo!

And here's a few more pictures - without birds - shibori style dyeing:

pink kumo shibori
kumo (spiderweb) tying comparison: the left side is 8/4 cotton, the center one is thread.

kara matsu and mokume
tangerine and pink - mokume and kara matsu

Tuesday, November 1, 2011

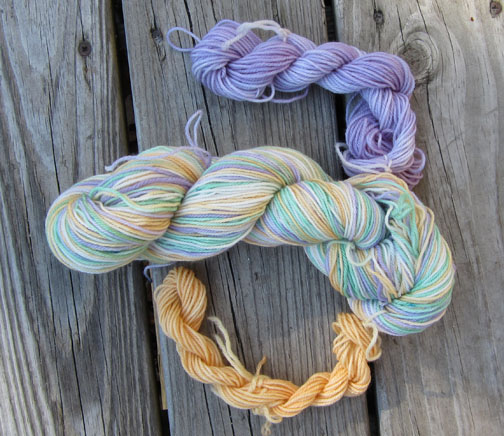
Newly dyed: sock yarn

sock yarn
sock yarn!
I went to a craft show a few weeks ago, saw a beautiful blanket with this color combination. Couldn't stop thinking about it. Finally I decided the only thing to be done was to dye self striping sock yarn with the colors, peach, mint ice cream green, and lavender, with white (well, undyed yarn color, which isn't quite white).

I didn't do this outside, which at this time of year would be tricky. Lately, (and I use the term loosely - it's likely been a year or more since the last time I've used acid dyes to dye yarn or fiber) I've been using my warping boards - I have one that's 14 yards, long enough for a four color yarn, and a 5 yard one, which I use to extend the size of the loop if I want to use more colors.

This is also the first time I managed to dye some of the yarn in coordinating solids - for toes and cuffs (and heels, but I'm not sure I'll have enough for all three). It's an idea I've been kicking around for awhile, but I never would remember until it was too late - so finally I get to try that!

Wednesday, October 26, 2011

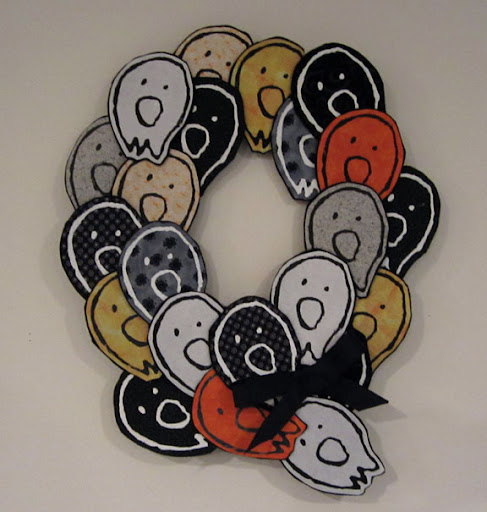
Ghost wreath!

ghost wreath
boo!

Just finished it. Now to find a place to hang it...

I put up a tutorial on Craftster.org, if you want to see some not so great in progress pictures I took with my phone.

Happy Halloween... eventually!

Friday, October 21, 2011

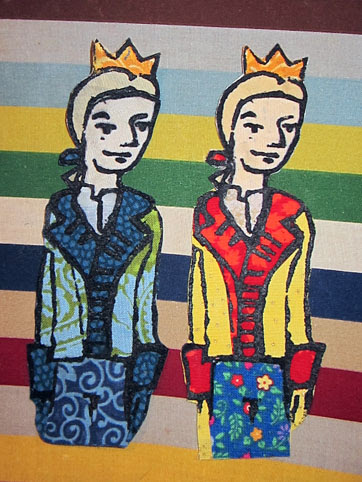
Cross Sectioned Crafts – folktale art piece: Two Princes

two princes


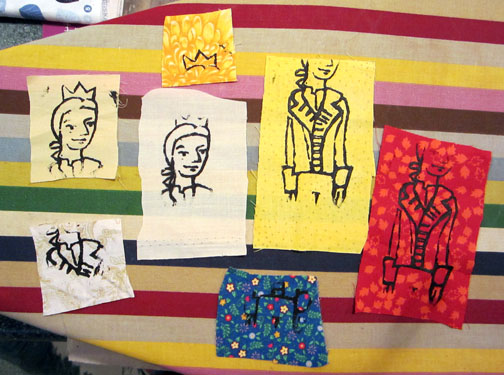
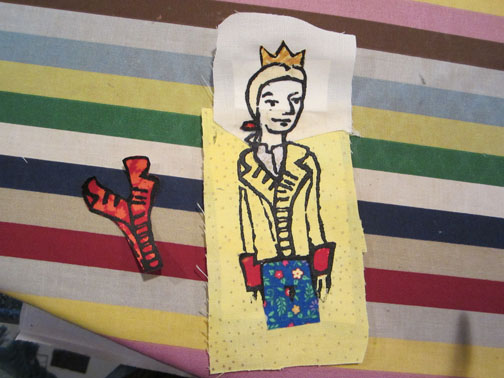
I printed these guys last night. This afternoon I assembled them, I thought I'd show you how that was done, and took pictures of the first, but when I came to the second, I did it completely differently, but roughly, here's the idea.

Prince in pieces
The prince in pieces

You know, technically, he's a king, not a prince. But, anyway.  And also, that's not the hair I used, I switched it out before assembled them. I made 2-3 prints of every piece I used, so that there would be replacements in case of unhappy prints.

Pieces were then fused to double-sided applique iron-adhesive. I'm using Heat-n-bond, which, I'll warn you, does tend to leak glue around the edges, but I'm using a second string iron, so it doesn't matter much.

On this guy, I attached hair and crown to the head:

assembling the head
assembling the head

Then the head was attached to the body, the cuffs and pants and shirt onto the jacket piece, and lastly the trim.

assembling the outfit

Then I put a piece of this background cloth behind his head because the fabric I'm using for skin is a bit translucent, then put adhesive behind him, and cut him out.

and, done!

Of course, writing this out, and posting these pictures, I realized I messed up on that first jacket. His shoulder should be yellow, not red.

(For the second - his head was assembled on top of the piece that his hair was printed on, and the jacket was assembled on top of the trim. It doesn't seem that either is more effective, but after the third layer, it gets a bit thick and unwieldy.)

Thursday, October 20, 2011

Cross-sectioned Crafts - folktale art piece, day 4: pies

Day 2 was spent touching up the screens again, and yesterday I started printing.  Just a bit, though, I was short on time... I only did enough for panel one.

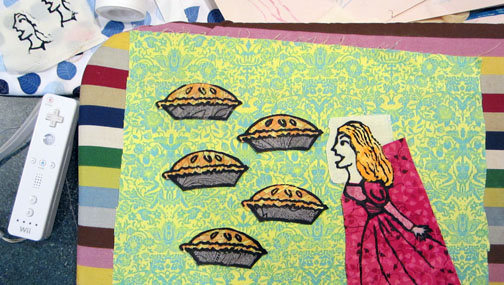
Today I assembled the prints:

panel one
It's a work in progress, right?

This is sitting on my ironing board.

I've printed on commercial fabrics (although her hair is hand-dyed fabric), then using applique adhesive, I've joined part of the prints together. The pies are cut out because they have adhesive on their backs, so they're ready to be placed in final places and stuck, but she's not cut out because she's not yet had that treatment.

And that's where it stands at present. Up to the minute reporting here.

Monday, October 17, 2011

Cross-sectioned crafts - Folktale Art Piece, Day 1

Day 1! Well, sort of. I've been working on this off and on for a few weeks, but it's just now getting out of planning and into reality.

Here is said plan:

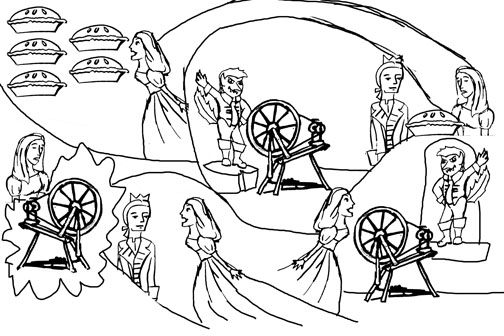
cartoon
It's the English version of "Rumplestiltskin" called "Tom Tit Tot"

I am apparently intending to illustrate a number of folktales employing fabric arts to do so. I've got designs for an African story about dogs, and a Russian one involving witches ready to go...

Anyway, for this one, I just now tested the screens:

screen proofs
screen proofs
And they need some work. I'll touch them up tonight, and I expect I'll test them all again tomorrow, while I start picking out fabrics.

Now, I'll be going back to the cutting table to work on the backgrounds for one of the sections.

Honestly, I'm not entirely sure this will work, but I'm excited to find out!

Tuesday, October 11, 2011

50 for 2011: #8 - a rainbow bag

Alright, like the one I made my sister, this is a Teesha Moore type bag. And the links to that are linked on that other post, so I'm not bothering now!

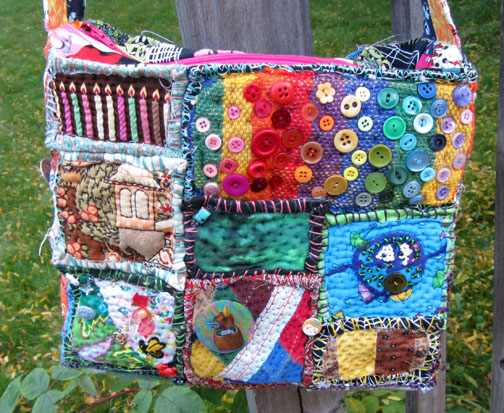
side one
side one - aren't the birthday candles amazing?

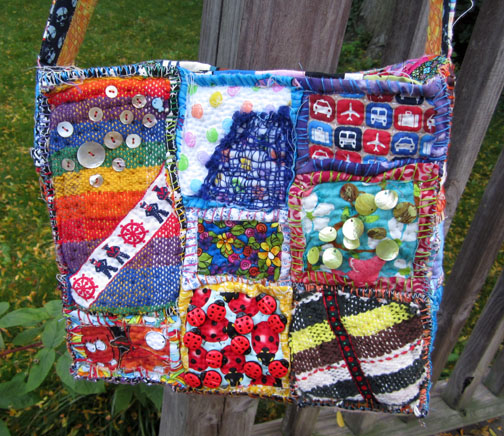
side two
bugs!
[

other views
other views
There is the other side (although, I didn't take a picture of it?), of course, and the bottom. And I guess this side view is the best shot of the strap, too. It's amazing, I'm very pleased with it. The strap and the bag, too. The only thing I regret is not putting interfacing the top where the zipper is.

inside
inside; please ignore my medicine bottle full of pins

Oh, and it's unlined, so it looks cool on the inside, too, but it also makes it less durable, I'm sure. Though, I'm intending it for a travel knitting or spinning bag, so, it's not meant for anything heavy.

....

Anyway, I kinda swore to myself I wouldn't make another one of these after that first one took ages, but then I was stuck in bed for like a week and a half, and being in between knitting projects, and having to send someone else into my stash to bring me something to do, I figured it was easier to locate my scrap box than send anyone in after yarn or knitting needles, which are organized in a way that only makes sense to me. And I had a few blocks left over from the previous bag... and a ton cut - often I'll cut a few 5" squares just to stash in the scrap box.... in case the mood hits me to do something I swore I'd never do again, I guess. Well, that's kinda me all over.

And it is a very portable project, up to the point of assembly.  Also, the kids liked playing with them and they were horrified when I started sewing them together.

One more picture! The center column is the bag's bottom. Sadly, the sides are not pictured.

most of the blocks
most of the blocks laid out for initial placement

It's funny, but I look at these pictures and I think of all the stories related to the fabrics or the designs or where I got things, and I'd like to comment on them all, but man, this post would take a million years.

But briefly: Two fabrics were woven by me. The white square is covered with a hand spun silk weavette square. One is a felted baby sweater. One is the leg off a pair of my husband's (clean!) socks. Two are fabrics my grandmother gave me. One was hand dyed by me for the jellyfish project (which I have finally started quilting!). One is made from leftovers from a zippered pouch.  And two fabrics have screen prints of mine on them, one of which was designed by my daughter, who put on the buttons on one of the other blocks. A number of fabrics and embellishments are leftovers from projects past (or current!)

This seems to put me at 26 for 50, and with, what, two and a quarter months to go? huh.

Thursday, October 6, 2011

Last minute jitters and a preview of The Bag

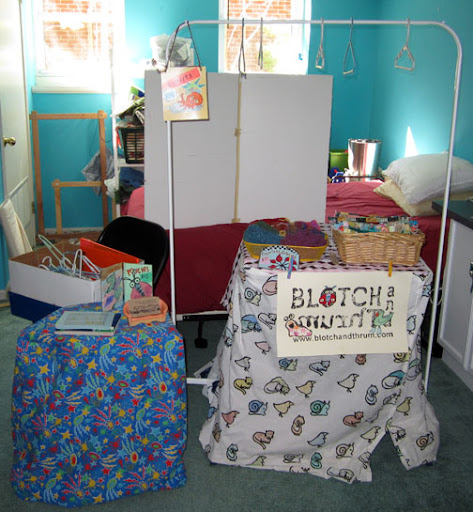
First, I've revised my booth layout, from what it was over the summer.  The new improved booth is set up in my basement (I'll take it down tomorrow!).

booth
I think it looks kinda.... sigh.

But I'm not certain I can revise it before Saturday! So, likely, this is it. I may add a sign on the blue table, and maybe decorate the clothing rack a bit, but otherwise... ta da! (The foam core screen is not part of the booth - it's just trying to block some of the mess in my guest room/sewing storage room from dominating the picture.)

Anyway, the bag! The bag gets a warm reception wherever it goes - tonight it went to a guild meeting. I've got the strap only partially attached, so it's not finished yet...

But, let me present some in process pictures:

bag in pieces with cats
the bag in pieces with cats

for the handle
and this became the handle

My first time working with selvages, though I've been saving them for awhile (obviously!). I'd wanted to do something with them seeing so many neat things, but mostly, I've just been using them to tie up skeins of yarn.

Wednesday, October 5, 2011

My fantastic test piece, and some news!

First the news!

I am going to be a vendor at an Ann Arbor craft show this weekend: Crafting with Grace. That's Saturday, October 8th, from 9am to 5pm. Very exciting!

Second, the proof of concept test! I have in mind a  ridiculously complicated art piece, but it will require printing on fabric and layering the prints... So, this is a fairly simple test run, that then became the centerpiece in yet another pouch.

a ghost
boo!
The ghost was printed on two pieces of my hand-dyed fabric, and then the green was cut and glued on with applique iron-on adhesives. I matched up the edges of the prints, so I didn't have to be too careful with the cutting.

The fabric on the top is what I used to line the pouch. Also: I put the tab on the wrong side! It's embarrassing. Still, overall, I'm very happy with the piece.

and the back
and, for the sake of completeness, the back.

So! Now, once this craft fair is over, (and the bag I've been working on is finished) and I get the Halloween costume I'm slated to make squared away, I can get down to working on that mysterious art project!

Tuesday, October 4, 2011

Cross Sectioned Crafts: Anatomy of a Screen Print

When I made up my most recent batch of prints, I thought here's an opportunity to lay out my process for you. Although I made three prints, I'm just showing you the one I designed on the fly - the others were drawn earlier, and therefore were disqualified.

sketches
1. sketching

I bought some bird fabrics, to go with a few other bird fabrics I had lying around, then I thought, I must have a bird print. I've actually been messing with the idea for a few weeks, but failed to come up with a design I was happy with. The final design was actually a combination of the two taller birds here, but is not actually pictured.

I like to sketch in crayon, because it gives a nice thick line, which is important for doing screen prints the way I do... primitively. ;)

The final drawing was scanned and then messed about with in PhotoShop. The end product:

retouched sketch
is quite a bit shorter than the original

The trouble is that for many applications I can't employ a screen print much taller than 5", so when I got the bird the right width, it needed to be compressed to be a usable length. Thank goodness for PhotoShop!

Then the picture was printed out at the proper size, and made into a screen print using the method outlined in this tutorial.

Once it was dry (over night is best!) I printed it (I use fabric paint - and a piece of cardboard on the inside to keep the paint from leaking onto the back) on a spare old onesie to check for mistakes:

test print
blue!

Then washed the screen and let it dry - I love the plastic hoops! I have some metal and wood ones, but the plastic ones are so great, because you can wash and dry them in the screen, and that is so much less messy.

test print
and now we examine what we've printed

At this stage, I like to compare the printed out picture with the printed picture. Some things, like the fuzziness of the feet, are just a printing error, and not a screen problem. But there are a few things I have to clean up here: the tail has a blotch in it, and there are a lot of loose speckles. These are pretty common with this method - my suspicion is that they come from putting fresh glue next to mostly dried glue, but who knows?

Once the screen has dried, a bit of pigment remains on it from the first printing, and this can be a great help in finding and fixing loose speckles. The rest - adjusting the thickness of lines, etc, is up to one's own particular desire.

Once I was satisfied, and left time for the screen to dry again, I could print the panels I needed for my projects (on hand dyed cloth, of course!).

bird pouches
(the fabric to the right is what I used to line both pouches)
And... those panels went into these pouches.

Tuesday, September 27, 2011

50 for 2011 - #7 -finish up the cat quilt

Wow, I'm really behind on this... I haven't updated this list since May!

Looking over my list, I see a number of things I've no idea what I meant by them... Two things I'm working on at present.  And at least one thing I finished, but didn't mark down.

Anyway: the cat quilt's done! Let's take pictures.
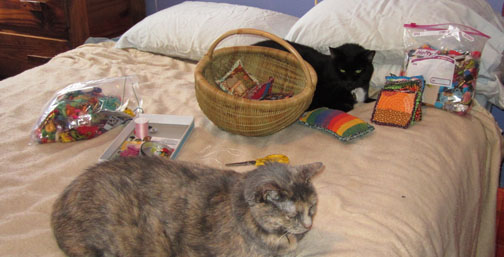
taking pictures of the cat quilt
Say "Cat!"

I finished this before my, um, illness, two weeks ago. But just now getting around to posting it.  I completed the top before my now 5 year old daughter was born, and then procrastinated on doing the quilting and binding... until now.

the whole quilt
And, no, it's not this shape, it's a fairly good rectangle.

obligatory backing shot
and the backing...

I'm not happy with the quilting, frankly, I find quilting on my machine to be kind of nerve-racking, and the stitches go from being super close together to being super far apart without warning.  I'm not sure I'll ever quilt anything so large again, and for all that, it's only a baby sized blanket... There's something to be said for just using ties.