-->

Saturday, September 2, 2017

There are threads and there are other threads

So, we moved to a new house a few months ago, and in our new larger bedroom there was some empty space, so I set up my loom, and set out all my weaving yarn, which had been packed away many, many years ago. Five?

I think they look pretty lovely, if crowded, on these shelves.


It's a pretty odd assortment of colors, I will admit. A few I bought on sale, probably the teal, brown, and navy, and a few from Paradise Fibers, which only has a few mill end (therefore cheaper) odd colors on hand at any time. (And by a few, I mean, 3-5...) I found there was a store near my parents that would sell you smaller amounts, but when I went looking recently I discovered that they'd closed in the meantime.

I decided pretty early on to purchase only the unmercerized cotton 8/2 type yarn, which is the main one for dishtowels, I gather, because I do not have unlimited space for an uncontrolled shopping spree. (I actually did make one set of dish towels once, for the record. Long ago.) Though I also have several skeins of 8/4 warp for making rag rugs, that totally does not count. 

I have also set up the loom, (I have a 30" ashford rigid heddle), and I am working on a scarf, trying to use some of that navy yarn. Though, it did not make much of a dent in the 3 lb? cone.

And I hope to get back to sewing, and maybe to posting, but with the move, well, my sewing room is not yet unpacked, so... so... sooooooo.....  so, I've been working on this scarf.

Saturday, March 4, 2017

simple lawn scarf


I've started a new job, where I am not working in a room that is a constant 85 degrees Fahrenheit, so I decided, fairly quickly, that I need some scarves for work.

The first two I made were two colors, so long rectangles sewn together, turned rightside out, and then pressed, with rayon and lawn. But here is how I have made two single color scarves from 1 yard of fabric (I used lawn for one and double gauze for the other.) This is cotton lawn is from Heather Ross's new collection, Sleeping Porch.

It's very easy and fast, even stopping to shoo away cats and take pictures for this tutorial, I had it done in an hour.

Step one: Iron your fabric, then fold it in quarters, so that the selvage edges line up. Trim off selvages and then cut it so that you have two 16 x 36" rectangles.


Step 2: Straighten up two edges, and sew your rectangles together, right sides together, at the 16" side.

Step 3: Pink the edges, and press the seam. I press to the side, but open would probably be better.


Step 4: Fold the whole thing in half, along the long side, and pin. I use two pins together to remind myself to leave an opening to turn it right-side out. I put the openning in the middle so I don't have to hunt for it. It needs to be about 5-6". Once you sew the seam, pink the edges, including the opening.


Step 5: Trim the ends, if you haven't done this already, so that they are square.


Step 6: Move the seam to the center of one side. Press the seam open, being careful not to press the sides. Press the seam allowance on the side of the hole open as well, using the seams on the side to guide you. Pin the ends closed and stitch them shut.


Step 7: Pink the seams on the ends. If you want sharp corners, you'll need to trim the corners. Turn the scarf inside out, making sure to poke out the corners.  


 Step 8: Close the hole. A whipstitch in a matching thread color would look best, but if you're me, you'll just think, well, it'll be right next to my neck when I am wearing it, so I'll just stitch close to the edge using the machine.


Step 9: Press and wear!

So, alternately, you can buy two yards of fabric and not have to have a center seam, and you would have enough fabric to make 2 identical scarves.

Thursday, February 23, 2017

Monkey Wrench

After I have made a number of scrap quilts (not pictured) I have a hankering to make a single line quilt, and that line is S.S. Bluebird, the newest line from Cotton + Steel, whom I love. I apparently happened to be browsing Pink Castle moments after it was released, and managed to snag some yardage of the hotly sought after prints. I mean, I assume they were hotly sought after, because, obviously, everyone agrees with my tastes, right?

I am also currently more into simple traditional patterns (not pictured) than doing the whole MODERN quilt thing, so I was looking through one of these 'so you want to make a lot of quilts really quickly' books from the 90s, and found a quilt I really liked, twin sized, which is my thing, and is just 7.5" Double Wrench blocks set on point.
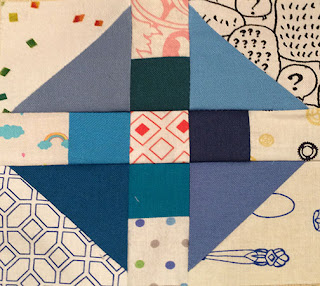
Double Wrench
I have done like ten minutes of research on this block on the internet and in the books I own. The block itself has many names (Monkey Wrench, and Churn Dash among them) but I will argue for Double Wrench as the correct name, because Double Wrench in the books anyway, does not refer to other blocks, whereas Churn Dash is used as a title 7 distinct blocks in The Quilter's Album of Patchwork Patterns (and anyway I'm pretty sure we all think of Churn Dash as this), and Monkey Wrench has 8. Barbara Brackman's Encyclopedia of Pieced Quilt Patterns has 4 entries for each. You google any of the three names, and you'll come up with both the typical Churn Dash and the Double Wrench. And then some other things.

And anyway, what drives me and people like me crazy is that, of course, the names mean nothing! They were used and reused and assigned to blocks that don't even relate to each other. Much like one imagines the state of animal taxonomy was prior to Linneaus.

But here is my quick block analysis. The corner units are half square triangle squares, and the center square is half the size. For a Churn Dash, all the subunits are square, a nine patch layout where the center block is the same size as the outside hst units.

And here is some size information:
N.B. - the hst subunit size is the size of the subunit once the two triangles are sewn together, the finished size of the subunit in the quilt will be (as with the squares) 0.5" smaller.

for a 5" finished block (like the one above), use (4) 2.5" hst subunits and (9) 1.5" squares
for a 7.5" finished block, use 3.5" hst and 2" squares
for a 10" finished block, use 4.5" hst and 2.5" squares

Other sizes are possible, but would require more thought/math.