-->

Thursday, December 17, 2015

Antique Tile, 2.0

So, this has been kicking around for months for no good reason, except I am finding it hard to find the time to sit down at the computer, but, anyway, it's done.

I released a quilting pattern into the wild!  It's free on Craftsy, and you can download it here. It was inspired by some clever piecing from Lori Holt's book Quilty Fun, which is really all about clever piecing, and if you don't have it, you should buy it. After that I was all, whoa, about it, then thought, couldn't that be expanded... to something like Antique Tile! And it works with charm packs to make 12" finished blocks.

You guys know I love Antique Tile. I've only made... (I don't even know) a half dozen (?) projects with it. It's simple and versatile and looks awesome.

I was hashing this process out at last year's Ann Arbor MQG retreat, so now that it's been almost a year, I should get this done. Especially since my example quilts and my pattern tester's blocks were all finished months and months ago! And thank you to all my testers! Your advice was really helpful!


This is a couch quilt, it used 4 charm packs (I started with two and quickly realized my error, and had to order two more!) It's 5 feet square, counting a 6" border. The line is Barcelona by Zen Chic!

Each block takes 9 charms, most charm packs have 42 charms, so, for every 4 blocks you want to make, you need one more charm pack.


This is a table runner I made using Tula Pink Saltwater fabrics and a solid with this method. It took only a little bit more thinking to get the blocks so the sea horses were still right side up. The quilting is a Leah Day design, Matrix, though her's is lovely and neat and mine is comparatively messy. But it gives a good oceany texture.


The last thing I made with this pattern is a crib quilt, 3'x4' and this was donated to charity. The quilting is an all over leaf design a la Angela Walter's first book. It uses Chirp Chirp by MoMo, whom I love, but I'm not sure I love this line, many of the fabrics are really cute, but I think visually, there is some problem in this quilt, I hardly know what I am looking at and I made it, but hopefully, someone will love it!

The pattern I wrote includes illustrated instructions, a coloring sheet, a table about the different projects you can make, and a separate page of instructions about making a two color antique tile quilt, and more about that in another post.

Anyway, please, download the pattern (and it's free, so why not?) and tell me what you think!


Monday, November 30, 2015

that magenta and lime green quilt

Well, it's the last day for QuiltCon submissions, and I hope you all have submitted some yourselves! I'll show you the ones I've submitted over the next few weeks, I put in 6! Not that they are all great, but because I had four fairly strong ones, and two I thought, well, why not? After all, because you submit in batches of 3, it doesn't cost any more to submit 6, once you've decided to go for 4.

Last week, I showed Fugitive Flower, my 300+ color quilt.

Today let me show you, uh, "Complicated Drunkard's Dots" Frankly, not actually a fan of that title. I've given it many, but none seem that great. This is a long shot to get in the show, I think.


But I like it! It's a combination of one of my favorite quilts from way back, and this tutorial I put up on my blog, called Complicated when Drunk, about doing piecing inside Drunkard's Path subunits.
And actually, this quilt is kind of an accident. Or is it a design challenge? I had a lot of lime green 2.5" squares for a quilt which grew out of that tutorial; when I had that top pieced, I realized that I had cut many more lime green squares than I needed, so then, I ended up making two baby sized quilts in addition, just using up those lime green squares. I'm quilting the other one now.


I'm not sure now how I hit on the red-violet and lime green combo, but I love it! It really seems to sparkle. And unlike the first quilt, there are no partial seams, so yay!


I used some nice lime green thread in large swirls to quilt it. The back is lime green, too. And the binding is a Carolyn Friedlander crosshatch. It's washed up and wonderfully soft.

It's interesting to look at, but I'm not sure it has that super strong graphic statement. I'm not sure that this is the best placement for 9 circles in a background of a particular size. I like everything about this quilt, how the busy patterns fade out with the high contrast between the two colors, and I'd be pleased to see it at QuiltCon, but if it doesn't get in that's cool, it will be going to the local Children's Hospital, where it will hopefully find someone to love it. And if it does get it, when it comes home it will still go to the Children's Hospital just the same, because that's what I always meant for it.

And I want to continue playing with the layout of this quilt. One day I will get it just right!


Friday, November 20, 2015

Fugitive Flower, Finally


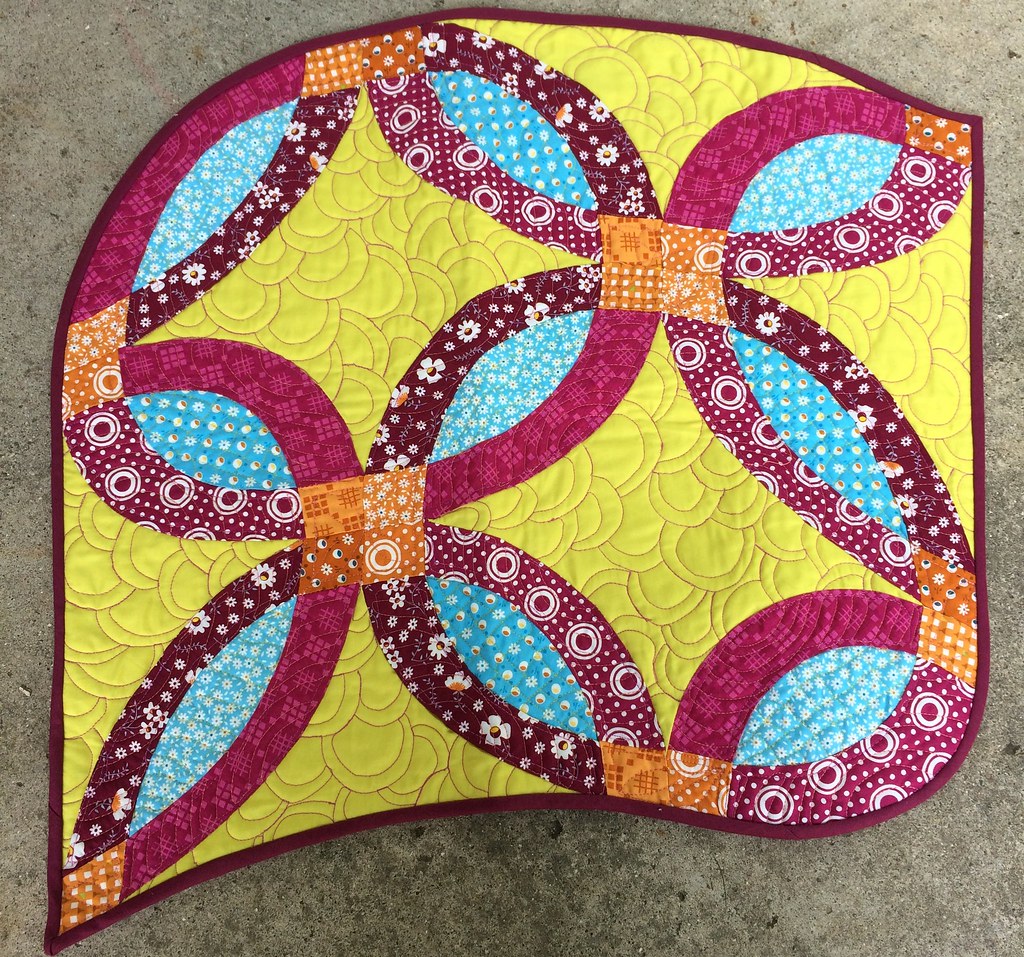
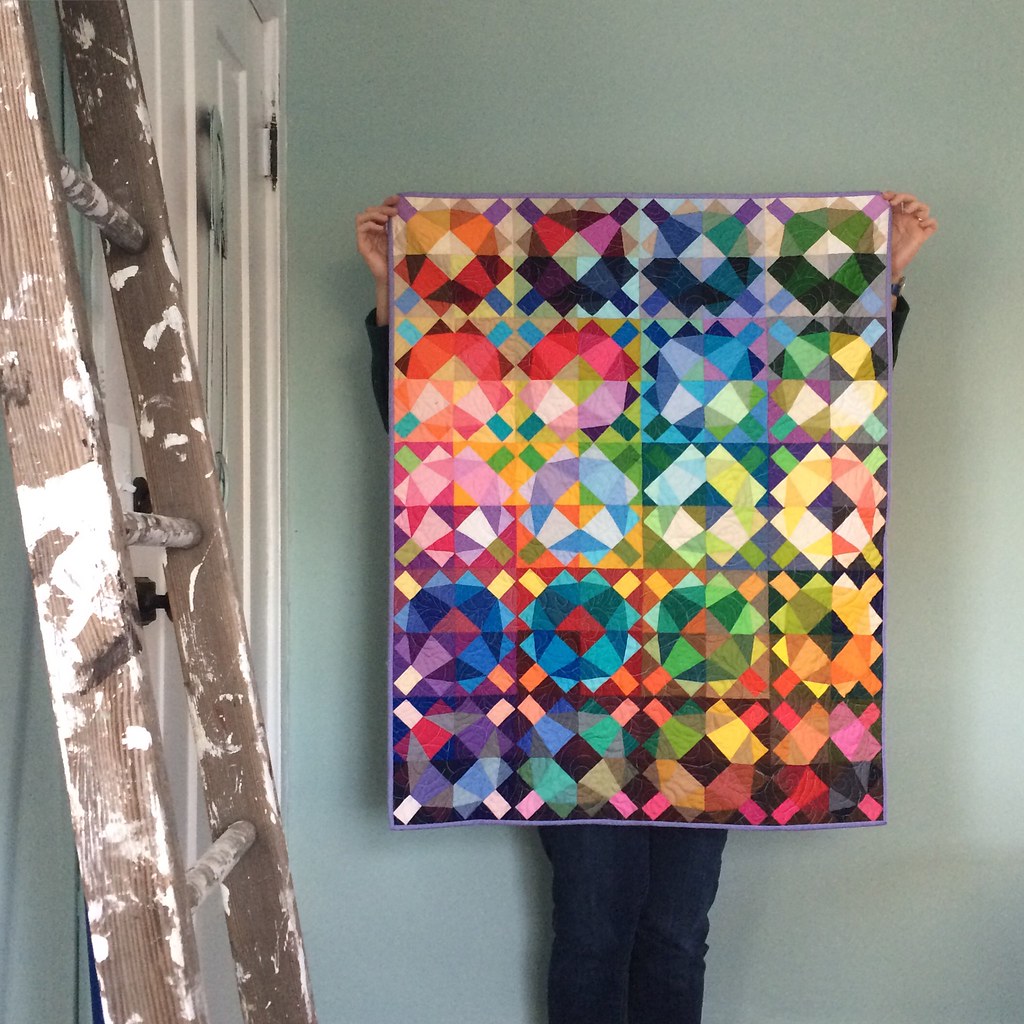
Portrait of the artist with the quilt.

It's funny, that when I looked back at my blog to see what I had posted about this project, it's just two posts. One post announcing that I was going to attempt it (and showing the materials), and one catchall post, where I showed some progress. And then it dropped out of sight.

I did some swaps, I went to Quiltcon, I was working on a few other things (including another large project I started like a week afterwards!) and paper piecing is... not my favorite thing.


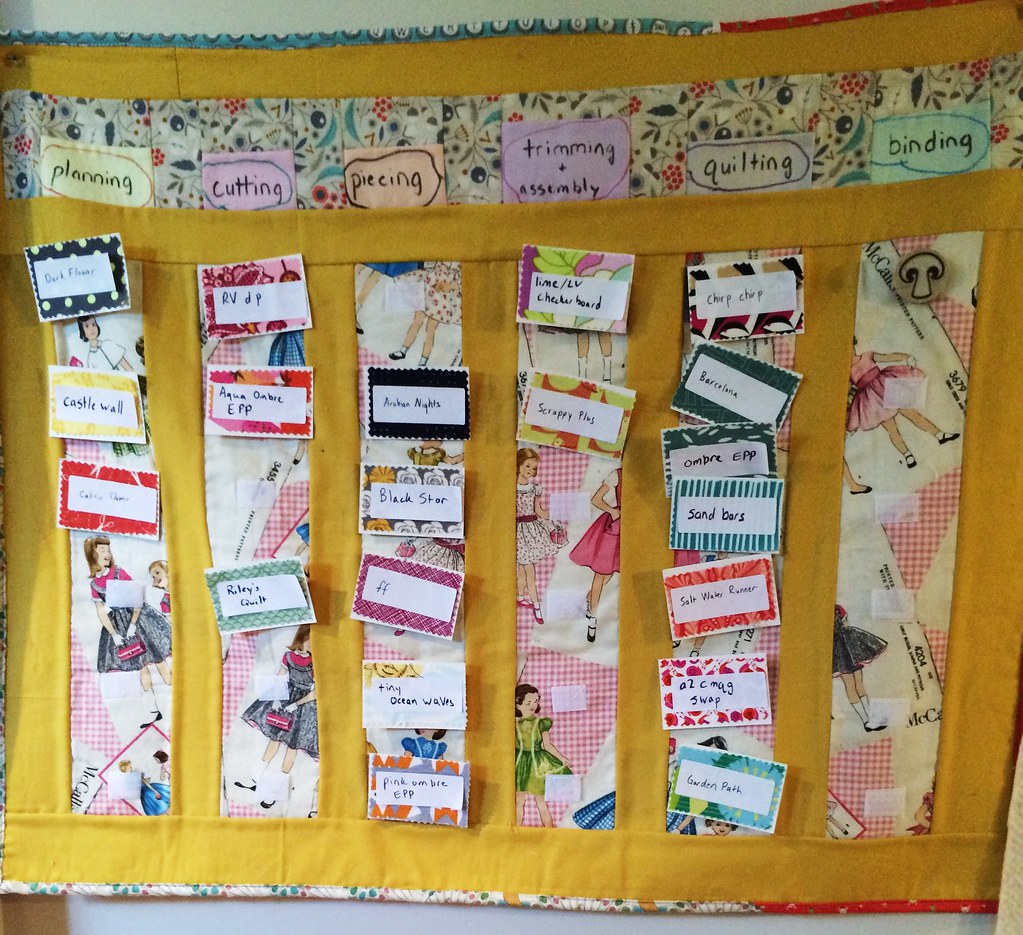
Not that it's awful! It takes a lot of dedicated space and concentration, its own peculiar tools, and it's not the most portable project, especially, when everything has to be just so. That is, labeled, in order, organized. When you have an 8 page book of fabric names to look up everything in to be sure it's going in in the right order...


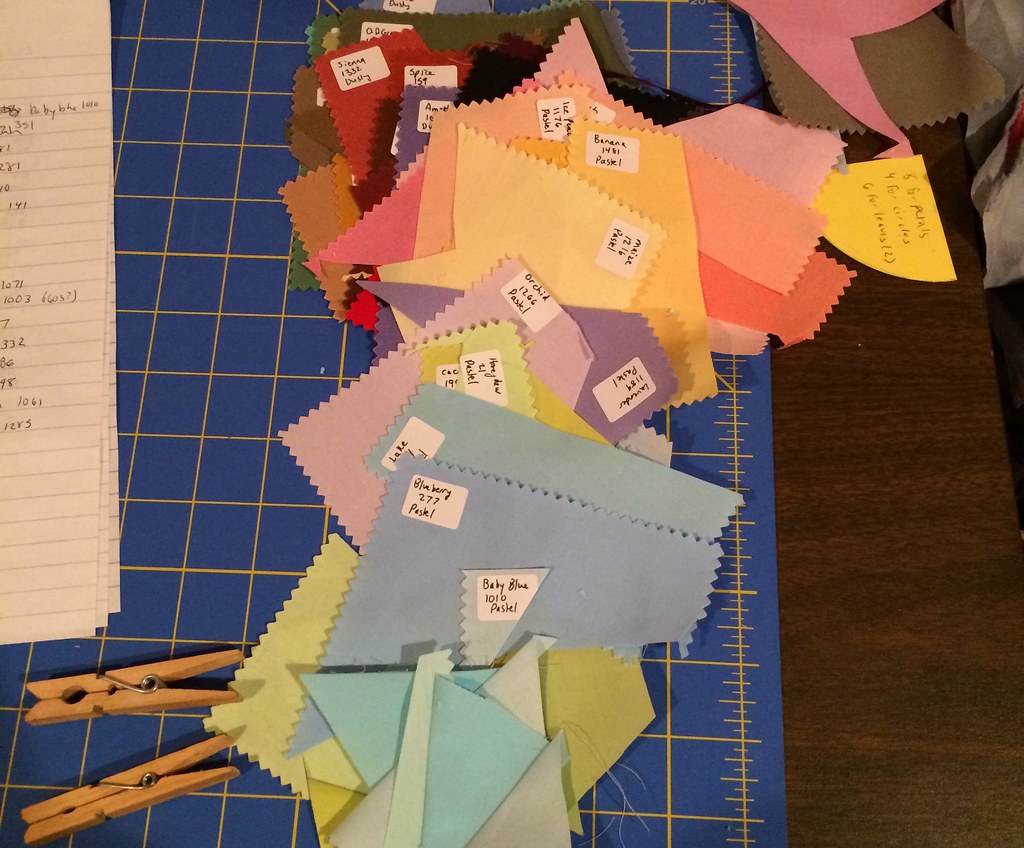
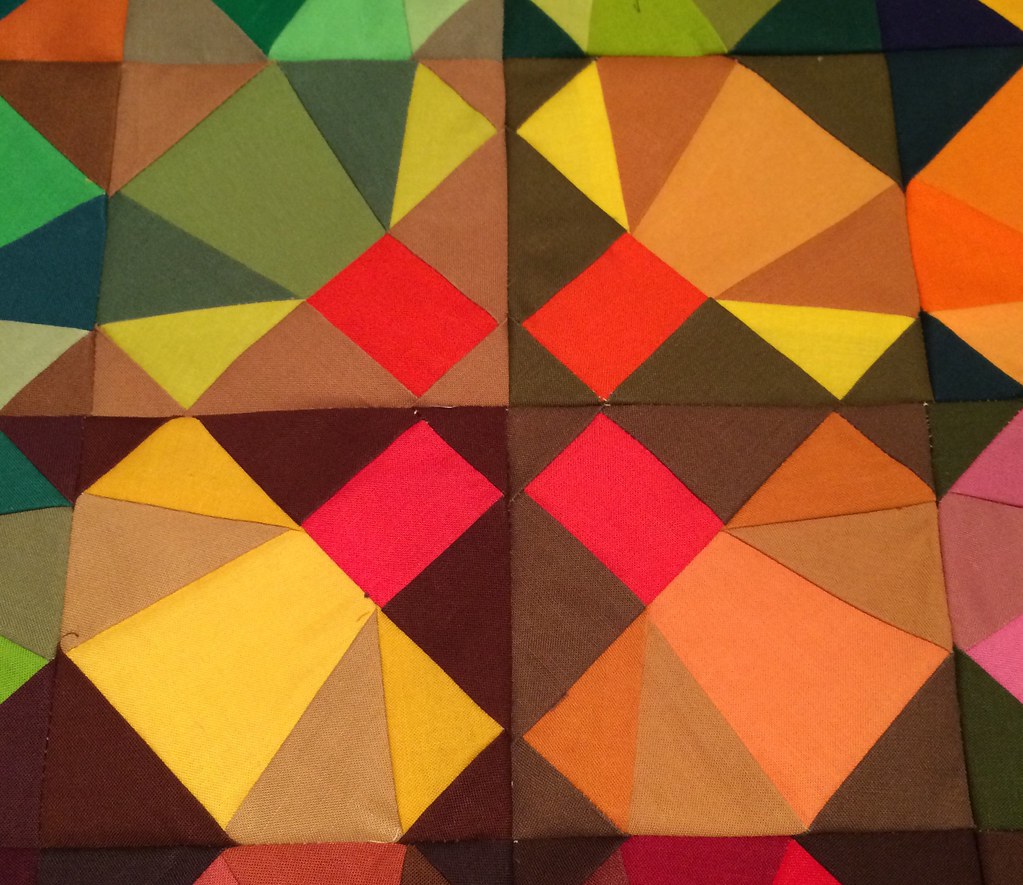
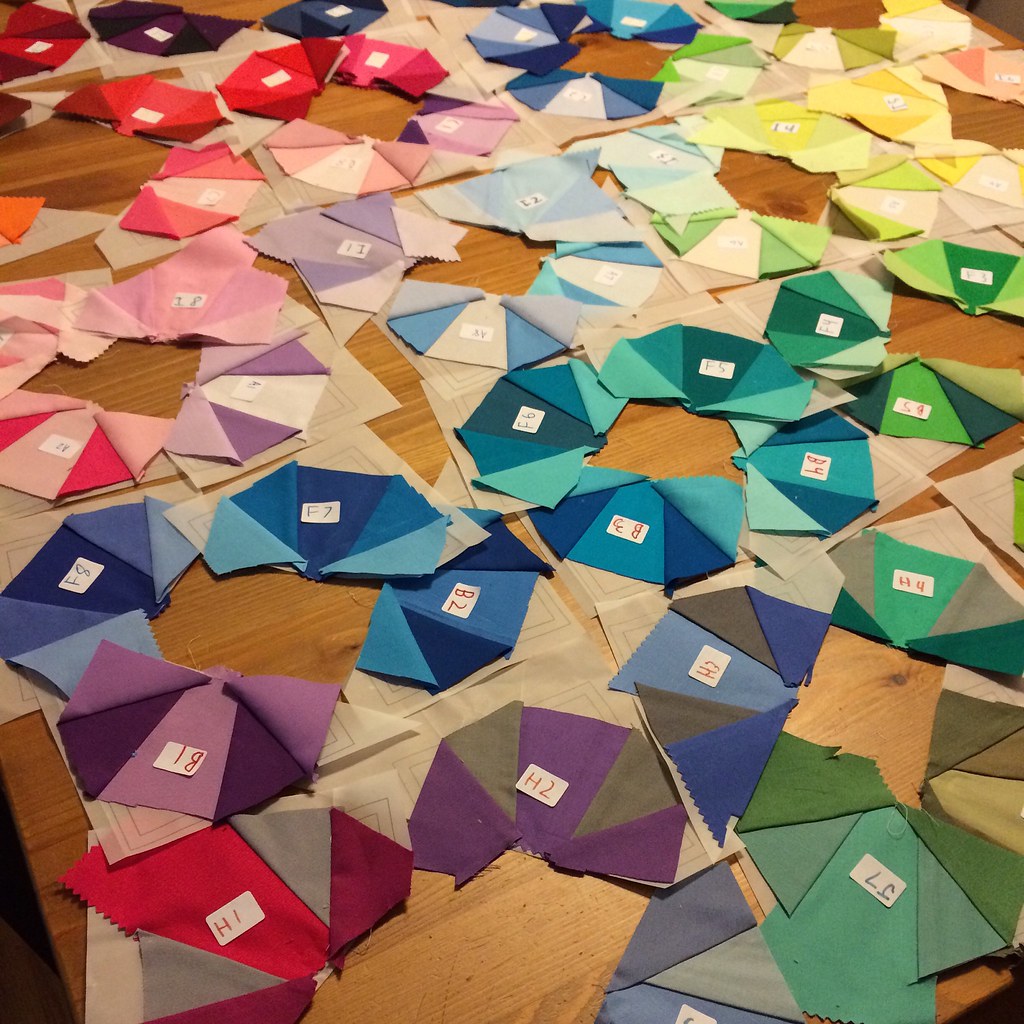
Did I forget to mention the vast organization effort that buttresses this quilt? It's a Kona 303 quilt, so it uses every one of the colors (and non-colors) Robert Kaufman puts out under the Kona name. It took 8 charm packs (Bright, Classic, Dark, Dusty, Neutral, Pastel, Summer 2013 and New Colors 2014) and that comes to 302 (I checked, manually, every color in the charm packs, to be sure they were all there; this is another quilt which owes its existence to time spent in bed sick, when I could devote an afternoon or two to such a silly undertaking). The last color is kona PFD, which I luckily already possessed, as I once spent much of my free time dyeing fabric.

Every fabric had to be labeled (every label had to be created). All duplicates were marked so that one could tell they were duplicates (see above). Then all the fabrics were sorted into piles by color (duplicates were put to the side).


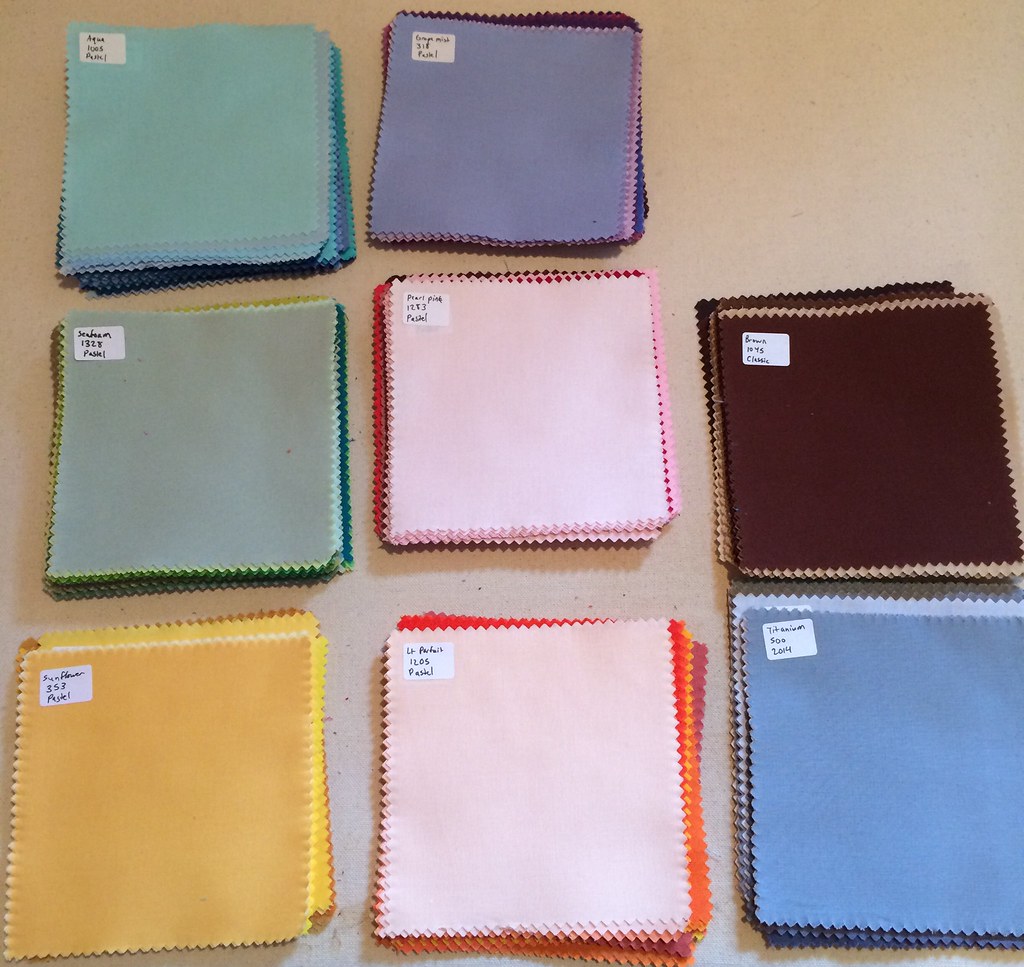
Anyway, I'd sorted the fabric into 10 groups of 8 petals, each composed of 3 charm squares for the petals. Whatever was left was added to the duplicates to create the background (though duplicates only stepped in once the originals were exhausted to be sure every color was in the quilt). Notes were taken on all this work, so that if things were disarranged, or I took 8 months off from the project, they could be reconstructed.

the background with no foreground
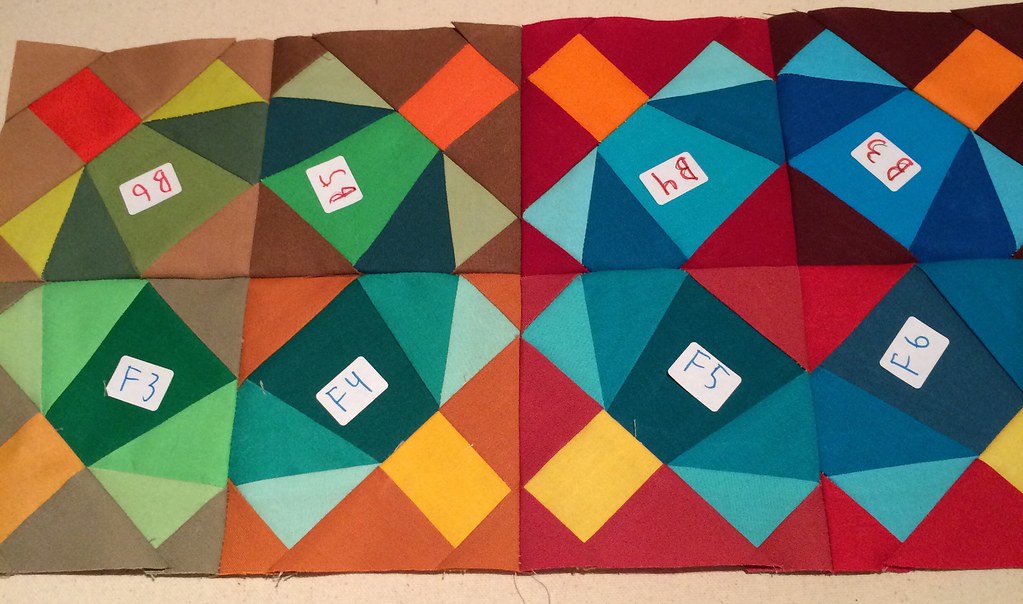
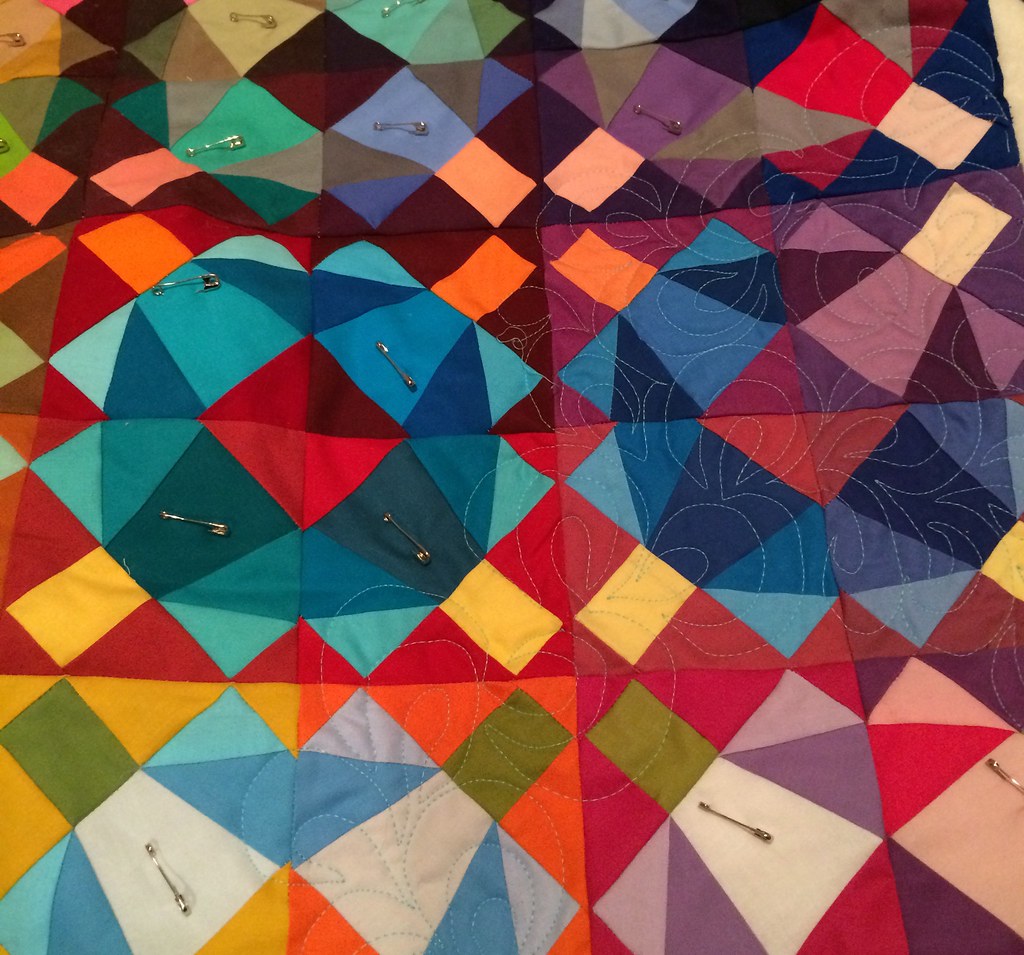
Once that's set up, it's just the great slog of paper piecing petals... Once the petals were done, it was time to figure of the best layout. For this, I had to use my dining room table, and I threw up my hands once, and walked out, and then came back and made it work. There are some compromises in color progression that I'm not super proud of, but... you have to work with the blocks you have, right?

The foreground with no background
 Then on to choosing stems. The colors of the stems are all duplicates, coming from scraps of what was left from piecing petals. Seeing as this is a quilt all about color, I did rainbow, but I decided (after I took the picture, I guess, to put purple at the top, so it's an upside down rainbow in the quilt).


This, too, was dutifully recorded. Each label was annotated with the corresponding grid number of the block it would be joined into. (And the background, and the petals).


Then blocks could be finished. And subunits assembled. And those joined into rows. And rows into a quilt.


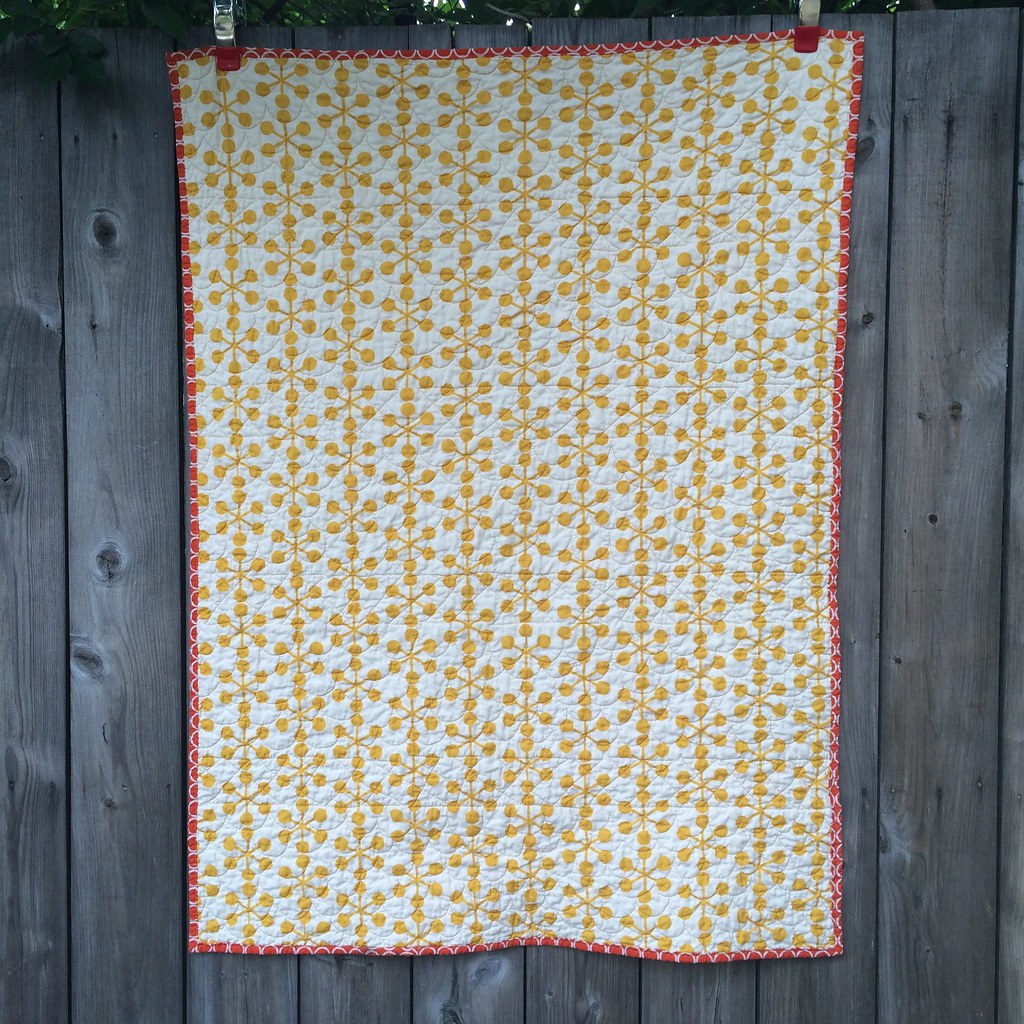
I quilted it all over with a light blue thread, using a paisley motif. (It has a nice Kate Spain backing, but I may never have photographed it!).


 Bound in Kona Lavender (coordinates with the backing) and done!


It's about... 32" x 40" tall. Would I do it again? Maybe. The seams pile up in  a way that makes them impossible to quilt, though, so I would hesitate. (Also, assembly? I broke at least 5 needles on this thing, guys). I also don't think it's the most elegant solution the the 303 puzzle. And... frankly, from a replicating the original standpoint, it's just not enough colors. As for releasing a pattern, well, I'm not sure about that either. Having made one myself, I'm not sure I want to inflict that torment on other people...


Sunday, August 30, 2015

Sandbars, a modern baby quilt

I was casting around for a quilt to post today, and having the binding half done on this one, I decided to finish it up and blog it!

Then I realized that I'd have to wash it first, because I used a soluble graphite pencil to mark the lines to quilt in, but still managed to wrestle it through the process in time to take pictures before late afternoon, so yay!


I call it Sandbars, as you may have already surmised. I designed it in response to a thought I'd had during a guild meeting. We have a charity quilt drive, I expect most of the guilds do, where we donate baby quilts to the local Children's Hospital. (We also have a drive for wheelchair quilts for the local VA hospital, but I digress...) The baby quilts that appear in meetings are fun and pretty, but not, as a whole, very modern- which let me stress is fine, and also the one I did before was seriously not at all modern, so I'm not trying to start fights, just explaining why I made this particular quilt the way I did. (Also there have been some amazing recent donations; I designed this in March, fresh out of QuiltCon, and maybe other people have been having the same thought.)

And I tried to design a very modern baby quilt, yet one that still said baby.


Here is my sketch book page, I was very enamored of lines, but I simplified it from the first draft, and added a third color. Two solids and one print.

I'm sure it would have stayed just an idea, but I got pretty sick right after Easter, too sick for work, not quite sick enough to just zone out, but too sick to concentrate on sewing curves and paper piecing, which were my ongoing projects at the time (still are! Oops....) So, this being a very straightforward quilt to assemble, I put it together, and when I started basting all my unquilted tops in July, it got basted too.


I backed it with this most awesome print from Comma.

I quilted it with upside down clamshells to make waves, and the walking diamond from Angela Walter's first book. And used one of the quilting techniques she suggested, extending the quilting past the shape, so that the waves and the bars form a series of lines down the length of the quilt.


The binding is another really great graphic print, from Robert Kaufman's Metro Living line. It's machine attached, though I did it upside down, so it worked surprisingly well, all things considered. (When you attach a binding to hand bind, you sew it on the front and attach it to the back at your leisure. With a machine binding, though there are other ways, generally, you attach it to the back, and top stitch from the front so that if the stitching wanders, it's on the back where it's less noticeable.)

I've been quilting all week, so I have a few more to bind. And a few more to quilt, too! Then I'd probably better see about that long neglected paper piecing project, as I'm hoping to submit that one for the next QuiltCon!

Sunday, August 23, 2015

The Week of Apparel Sewing, part two


As mentioned in last week's post, I spent a week at the beach, sewing garments. Now I will show you the long planned dresses.

Cinderberry Stitches's newest line, Salt Water came around the time that I was making those first few Flip Flop Dresses in May, and as my daughter has kind of an obsession with mermaids and dresses, so they were an obvious match made in heaven. So, I bought three prints for the dress, and several more for my stash, because adorable! And then it hung around for weeks, until I dropped it into the pile of projects to take on vacation.


This is the least embellished of all the Flip Flop dresses I've made (no pockets! no bows! no contrast hem!), but I went with the contrast sleeves to relate the bodice more to the skirt. It looks, well, a bit plain. I really like the print, but it doesn't carry off the large space so well.

Obligatory sleeve close up:


I'm sure you are wondering now what color this dress really is. The bottom photo is much closer to real life than the top. It's a corally bodice with a pale pink skirt.

After I made the border print dress that I wore at quiltcon, I've been scrutinizing border prints for their suitability for the pattern. Many aren't quite right, either printed half way and then reversed, or they are long gone (ie that amazing print from Nordika that I would so make a dress of if I could locate 2.5 yards of it in teal.) But I did come across an equally awesome one this spring, from Sarah Watson's Biology line for Cloud9. And did nothing with it for a long time, and I had left the pattern pieces out on my desk, where they got ripped and scattered, and somehow, by cleaning off my whole desk (for once!) I managed to track them down, and the instructions, but not the envelope and not the rest of the pattern, which is sort of a problem, because I used the wrong sized skirt, and had to guess where I should add in extra pleats to get the thing to fit the bodice. Oh well.


Also, this is the one project I had to run out and get things for, because I had forgotten the bias binding tape to finish the armholes!

But I also ended up using that on the hem, after discussing options about hems on Instagram. The pattern runs from selvage to selvage, and I didn't want to obscure the flowers by folding up the bottom few inches. So, I sewed it to the bias tape, and folded that up, and sewed the other side down.


In addition, I didn't like the options I'd brought for the pockets, so I drove over to So South Haven, and they had this Oliver and S print that was perfect!


Then... the bad news is that the interfacing I used, pellon's SF101, shrunk in the wash, and now the midriff band (and the neckline facing) has a weird puckered texture. Apparently, one is supposed to prewash this stuff (warm water, hang dry...) but I didn't have an issue with the other dress, so, I was just floored at the issue. I have been pointed to Fashion Sewing Supply as a place to buy interfacing that is not prone to shrinkage. Which I will try when I've recovered from this disappointment.

Anyway, I can still squeeze into the dress:


But I may remake the bodice (or at least, remove, remake, and reapply facings and midriff). With different interfacing. I have quite a bit of fabric left, because I was cutting a different way then the layout diagram suggested, so I bought an extra yard in case I needed it. And I guess I might, but I'm not ready to go back and fix it yet. The disappointment is still too raw.

In the intervening week I have finished up another quilt top, so I now have eight to quilt, but at least only one of those needs to be basted first. So, hopefully, you'll be seeing quilts in this space soon!

Sunday, August 16, 2015

The Week of Apparel Sewing, part one; leftovers

Last week I went on vacation with my family,  and I of course brought my sewing machine (actually I brought two, in case anyone had the urge to join in) and I brought several apparel projects because unlike quilts, they are fairly self contained; only the fabric, interfacing, fastenings, thread, and patterns, oh wait that sounds like a lot! but with quilts, it's all that (except the fastenings) and much more of it. And it requires space to lay things out, which one is not always assured on a family vacation.

So, in the mornings, we went off to the beach, and after lunch, I sewed. And also after dinner! And also after the kids were in bed.

I made two dresses for a child, two pairs of pants for the other child, a dress for me, and revamped a skirt I'd made earlier and made shorts from knit fabric, which was a first for me. And I didn't even get to all the projects I brought. (And I only had to run out once, for single fold binding tape.)

But first, let's talk about leftovers, by which I mean, I guess, two things.

You buy a yard of knit fabric to make a pair of pants, say:


The pants require four long columns of fabric, and the waistband is cut from the remainder.  And what do you do with that square of fabric left over? I guess I've been saving them for I don't know what, but here's an idea:


Tiny shorts for a smaller sibling? And unlike pants there's no horribly long side seams, so they take very little time. The only issue is that one side has to be cut upside down because of how little fabric there is, but what of that?

I worked these up from a Simplicity pattern for woven shorts for wearing under dresses (the idea of which makes  me vaguely upset, but anyway) but it's another case of adding fabric to the bottom and shortening the rise, and the waistband is altered completely, so there is very little point in pointing anyone to the pattern. Just as I'm not going to talk about my pants pattern, though it is a knit pants pattern from Maccalls, with the rise shortened, and the waistband altered, and the bells and whistles all left off.

I kind of like the fabric to do the talking, not the extra stuff.


This is my second wearable muslin for the shorts, the first being large enough for my older child.  But, hey, still wearable! And it uses very little fabric, on account of the fabric being stretchy and the subject being tiny.

The other kind of leftover is the perennial favorite, the fabric shop remnant. My local quilt shop, Pink Castle Fabrics, had a sale on their apparel remnants, which sit on a shelf near the cutting table. I looked through one day and found three pieces of this Cotton + Steel print in two colorways. So, I conceived this Flip Flop dress to use them. The long skinny remnant became the contrast hem, the skirt was cut from the larger blue piece, in a 30" column (then split in half), the bodice was cut out laying sideways (thankfully it was not a directional print!) and the larger red violet piece provided both the bow/sash and the bodice lining. And it's cotton lawn, so it looks fancy but feels super soft.


I'm probably going to skip over showing you every pair of pants and shorts (though you can see them in my instagram feed), but I've been taking pictures of dresses today, so you'll see those up soon! The skirt has it's own saga, so it may get it's own post, or maybe not. Maybe I will finish a quilt sometime soon instead!

Sunday, July 26, 2015

Housekeeping

Last night I took two hours (more or less) to make binding and bind a quilt that has been sitting around, quilted and untrimmed for at least six months. (And I finished it in April of 2014, apparently. eep). Here's a post about the construction on the Pink Castle Fabrics website. It hung in the shop as a sample top for a bit before being sent out to be quilted by Kathy of Thread Bear Quilting. You can't really see the quilting here, but it's really cute, bird and swirls.


Once the line was out of the shop it came home to me, and needed binding. For months. One reason this stalled was that I bought the right navy solid for the binding and lost it. Yesterday, I decided enough is enough, and I had to have something that would be fine. I used Kona Kumquat to bring out the center of the daisies. 

I machine bound it because no one has time to hand stitch binding on quilts that aren't for show.

Because I have spent the last week basting seven quilts for quilting.


Because... the dire truth is that this quilt planning board is wrong:


And while this is closer to the truth:


I suspect a few things may still be outstanding.

The thing is that I have been trying to clear the board before I start new projects, but I had been under reporting to myself the number of projects that are ongoing. So, maybe it's not just a summer project, to finish up the old things. But, I still have to take it one quilt at a time.

Sunday, July 19, 2015

English Paper Piecing Peacock Pillow

Last night, I basted and quilted and assembled this pillowcover:


I actually finished piecing it in the car last weekend, which is nice because it started as a car project. I had stalled on my endless red hexagon quilt project, and Easter was coming, and we were traveling to see relatives. So, I pulled out some half hexagons I'd gotten from PaperPieces.com and some fabric chosen quickly from my stash and went.


Here is an on the road picture of my progress.


By the time I got here, it was not much of a car project anymore. Because of the symmetry, I wasn't comfortable working when it could not be spread out before me.


Then I added some pink because it needed something. I started carrying it around with this square of fabric I'd cut to the ideal size (the size to fit the only unused pillow form in my stash) for the pillow so I'd know how many pieces I'd need to add. And it stayed by my elbow for awhile, until only a few pieces remained to be pieced, then I finished it up on the drive to Chicago last weekend.

I basted it by fusing (so easy!) it to fusible fleece, then did some free motion quilting in the cogs, and echoed that in the background hexagons. I used a warm gold color for the thread.


Then I put it together with a simple envelope closure. I used the mustard yellow print from Glamping as the backing because it's a sweet print in one of my favorite colors. Also, it matches my couch. Which is important for a pillow, right?

I've been working on a third English Paper Piecing project while being a passenger on a road trip (road trips! it's sort of a theme this summer, apparently), which I finished up today, and pulled the pieces out of! Yesterday, I cut its replacement, because if there is going to be time for me to sit around in a car, I want to be ready! I'm very excited for these, and can't wait to share them! And as always, you can see sneaky peeks on Instagram.

So, anyway, with that finish, I have seven projects to baste, and that needs to start happening now. It's not my favorite step, but I can only track six projects, after all!

Sunday, July 12, 2015

And I'm done (for now!)

I'm sending my oldest child off to camp (for a while) so I had to do a lot of hemming and mending and making, and I broke a double needle hemming pants, and that was really exciting, though luckily I had a spare, so it didn't break my stride.

And I've used the serger more this month than anytime previously, I think, making shorts with twills and oxfords, hemming terry cloth pants (or whatever they are? They're seriously sheddy.)

But, anyway, what I made:

1. pair of white jersey pants, not pictured because they are boring. But horrible to make! Because the snowblindness, and having to study it to decide what is the right or wrong side of the material. Though knit pants are super simple to put together at least.

2. pair of shorts, with birds.


Oh, I can't help thinking these would be better if the flowers were at the bottom and not the top. These were a huge mess of fabric placement problems, starting with the fact that the fabric is printed across the grain instead of with it, which meant there wasn't enough fabric for the waistband, and it had to be done in pieces. And I would have preferred birds there, but didn't have the yardage to choose. I really still think the fabric is cute, but I would buy more fabric and think harder about how to cut it, if I was doing this again.

The pockets are from the new Anna Maria Horner woven line, Loominus. That fabric is super soft, though this colorway is a bit eye-stabby on the bolt, it's nice in small doses.

That is an important note, isn't it? Most of the time we can get by with 3/4 of a yard, but sometimes the design of the fabric stands in the way.

3. Cat shorts:


Oh, this fabric is my favorite. No complaints on these shorts! The repeat is nice and big and varied (and runs in the right direction), and nothing went wrong.

The pockets are pandas eating donuts. So fun!

4. Fox shorts:


I also love this fabric. No problems for the same reasons as the cat shorts.

The pockets are left over from a project I made last summer, so unavailable currently. But an old Monoluna print from Raaja, I think?

And now, I can get back to quilting. At last!

Sunday, July 5, 2015

Warped Double Wedding Ring, part 2


I finally got this quilt back (I say finally, but it's totally my fault for forgetting to pick it up!) so I took a picture:


The Ann Arbor Modern Quilt Guild has a Pie Making Day challenge at the end of this month and this is my entry. The fabric was designed by my friend Brenda, and is available for purchase at Pink Castle Fabrics, and I really love the yellows and greens in this line best, and then I didn't use them, because, art is all about leaving things out, isn't it? (Is it? I really don't know...) Actually, this was a four color design, and I wanted to use a different green, and then the yellow didn't work.

For quilting, I made each area different. The orange parts are quilted with orange thread with sort of a flower (not pictured). The green is contrast quilted with a ring. It's based on this Leah Day design, the Daisy Echo, but without the daisies so that it would be suggestive of rings, because rings... Anyway, when you can't think of how to quilt something, just browse Leah Day's amazing Free Motion Quilting Project) and be completely inspired.


The red violet pieces are quilted in semicircles, with orange thread. The blue petals are my favorite, quilted with another of Leah Day's designs, Matrix, in green thread. I love this one so much! It's super easy and looks awesome, and I want to use it on everything.

I tried to just outline the red violet bits in red violet thread, but I need to cram my free motion quilting in, or else it looks not done to me, so, I went back and added.

This was put together quite a while ago, but looking at the pictures today, I'm all inspired, and thinking about how much I love quilting! Which is good, because I certainly have a stack of tops to quilt! (And baste, which, uh, I do not love so well.)


Sunday, June 28, 2015

The warped double wedding ring quilt(s)


Well, I had this grand plan about putting both quilts into one post, because they were made practically together, but I seem to have lost the photos of one of them, and as neither of them is currently residing with me, I sadly, must present an incomplete post!

I had been thinking about double wedding rings since I saw Victoria Findlay Wolfe's curve piecing demonstration at QuiltCon 2015. And my partner for the Cotton + Steel swap had a lot of mini quilts, and I was looking for an idea for something that would be very different from anything she'd received before. I had already downloaded this pattern, and I don't know why I decided that wasn't hard or different enough... But it wasn't.


So, I imported a picture of a double wedding ring block into Illustrator and traced the shapes, then duplicated them until I had the number of rings I wanted, then used the warp tool to shift them around until it became a shape altered enough to look odd, but not so difficult to piece. Then I broke them into pieces, and added a 0.25" seam allowance using Daisy's tutorial on Ants to Sugar, and had a friend of mine with a 36" printer print them out.

No two pieces being alike, and making two quilts at once, I would cut out the five pieces for each peel unit at a time, then assemble it, before moving on to the next peel.


And it was not as bad as I expected to assemble, although the piecing looks more complex than a drunkard's path quilt, it's much more forgiving, because they are shallower curves.

At the end of the piecing, I had two quilts, one I had to finish up and send off to Quilt Market quickly, and maybe never took pictures of, using Brenda Ratliff's Pie Making Day fabric, and one for my Cotton + Steel swap partner, using Cotton + Steel fabrics.


I did some cute swirls for the quilting, in a pink thread that matched the background. I used a very light gray for the binding, a little bit of quiet on a busy quilt.


The back was assembled from scraps from my other Cotton + Steel project, which I hoped will be done eventually. (Sigh, the less we talk about that the better!)

This is the best picture I have of the other one, though it's all clips and unburied threads! I invented a new free motion quilting pattern to quilt it's background, interlocking rings! and did specific patterns in the pieces rather than my usual overall quilting. I have to say... although I think it's amazing when others do this, I'm more inclined to stick with single pattern quilting, because it's easier and I'm essentially lazy. But, it's good to try new things just to figure that sort of thing out.

A photo posted by Amy Given Sewist (@blotchandthrum) on


But if you're asking for a pattern, I don't think one is forthcoming! I did save all my pattern pieces, I think I may make another if I can think of something more exciting to do with the pattern.

Post with that quilt's proper picture is here.

Sunday, June 21, 2015

Fold Over Sewing Pouch

My chapter of the Modern Quilt Guild, the Ann Arbor Modern Quilt Guild, is having a tiny piecing swap. Which means, as long as you include some tiny patchwork, you can make whatever you like, and we'll do a yankee swap to exchange items.

First I started by looking through this giant book of quilt blocks for inspiration, because I had been making a lot of stars recently for another swap and thought I should branch out.


(The stars are based on a pattern from Lynn Harris's book, Every Last Piece, which is amazing, beautiful, and thought provoking about some things I tend not to think about, scraps and stash. This particular star is *gasp* even smaller than the tiny stars in her quilt...)

And yet I didn't want anything too complicated, because, well, tiny!, so I ended up doing a fairly simple Seminole Patchwork style block with the two tiny bits of Lighthearted I had and three solid fabrics. Seminole patchwork is a way to make multiple intricate and repeating blocks using strip pieces, recut and positions and cut again. Elaine who blogs and instagrams at/as Messygoat has a good tutorial and overview if you're interested. (Also, you should check her out because she's amazing.)

I started with 1.25" strips cut from fat eights, four of the navy polka dot, four of a pink solid (bubblegum in cotton couture), and one of the floral, and sewed them in groups of three. Two polka dot - pink - polka dot, and one pink - floral - pink. Then I cut them into 1.25" units and reassembled them into checkerboards. Then I bisected a number of 3" grey squares, sewed them on the checkerboards and cut them down to size:


I ended up with five blocks at 3.75" unfinished, and saving two for the interior, I added some navy and pink (using the leftover Lori Holt bee print from this skirt) stripes to stretch the three blocks out, and then strips of floral and solid (because I measured the floral badly... Sigh).


And then I had the cover for a Fold Over Sewing Pouch, a cute pattern by Aneela Hoey. And one I'd made before, though this time I followed the whole pattern and added the pincushion and the needle book.


The inside needed to be pink. Obviously! But... here's the thing, I don't actually own a lot of fabric that is pink. But what I do own a lot of is Tula Pink Fabric! And wouldn't you know, the pink fabrics from Birds and the Bees is just the right pink!


So, it kind of got this amazingly expensive Tula Pink interior, which is hilarious. Plus I pieced the squirrel in upside down, and then used fusible fleece rather than batting, meaning I wast stuck with it, so I had to invert the positioning of the interior in order to make it appear right side up. Though the zipper then became upside down. But anyway! I would rather have someone use and enjoy this bit of highly desirable fabric in a sweet little sewing kit, than let it sit forever on the shelf (and it would be unthinkable to sell it!). And it's much more exciting as a thing than as a potential thing, isn't it?

Now I'll wrap it up for the meeting! Can't wait to see what everyone's made!