I wrote it up as a page on my website, because the url would be easiest to tell people at Maker Faire, where I will be demonstrating this exact thing this weekend out in the heat!
So, here's link: http://blotchandthrum.com/paper.htm
And maybe someday I will do a pdf with pictures, but it is not this day...
My life, in various craft manias - fabric design, sewing, quilting, dyeing, batik, shibori, screen printing and weaving... And many things, I am sure, I haven't thought of yet.
Monday, July 23, 2012
Wednesday, July 4, 2012
Batik post mortem
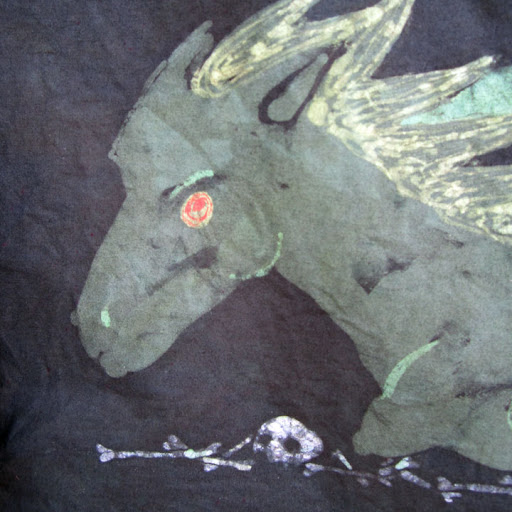
I just washed it on Tuesday morning, to take pictures. Sadly, no good one of the whole piece! But here's a taste:
 |
| The horse turned out okay... |
So, a while back I had an idea for a batik piece based on a Tartar folktale about a witch/bloodthirsty water spirit (who does ride a horse...). I have done batik before... my birds, for instance, are a bastardized version of it, but I was thinking a real, honest, no ink, just wax and dye project. Then I was reading a book that said, you can only dye things 4-5 times... and asking around, people seem to agree, with the caveat that if you dye very light colors to start with, you can squeeze in a larger number of shades.
And I wanted both orange (for foxes!) and blue (for water!)! which can't co-exist, in a sequential order (that is, you can dye one, and wax it, but if you dye the other, everything turns brown, so nothing is orange, or blue or which ever the second color was). so, sadness.
Then I bought fabric paints, and figured I would cheat. Deciding to paint in the orange first thing, then wax it along with the white, and then four colors (green, blue, grey, and black) I was all set, except for one thing.
The wax. I use soy wax, entirely because it is easy to clean up. You can wash it out of textiles with hot water and soap, unlike, say, every other kind of wax. But unlike every other kind of wax, it is soft, and prone to leach out of fabric, a point brought up to me by the one person who I could find to ask about this: Margarita of Margas Crafts (and go look at her blog!) who also uses soy wax.
I have done batik style dyeing, in multiple baths, by piling on lots and lots of wax. But while she thought that the wax probably wouldn't last through the dyeing, I thought there was maybe a chance.
Well, she was right... It does not work well. However I think it failed in an instructive and interesting manner. The wax, even if not thick or applied to both sides, will survive one dye bath:
 |
| bones, painted in wax, one side of the cloth only, then dyed in one dye bath (medium gray) |
But the wax degrades over time or exposure to water or both, so, by the fourth dye bath, which was black, everything that was supposed to be white was mostly grey:
 |
| four dye baths later - for both the red fox and bones |
And patching it before every dye bath does not work either! (which, had I remembered! I'd already been taught. It's a trick for adding texture, to let the wax cool and then add more next to it, it doesn't join, so there is a hairline crack for the dye to seep into.)
But I think I can use this information to my advantage and I am not discouraged, although I will chose my next subject with care and not have so much fiddly detail... I just can't expect it to be the sort of wax it is not.
And actually, the unpredictable breaking, cracking and wearing out of the wax (what 'proper' batik wax would avoid or at least decrease) is what I like about soy wax (that, and the easy clean up) although it destroyed this project... (but it wasn't the only issue, my colors also were poorly chosen or executed. green was green, but blue on top of that was also green, and grey on top of that was also green...)
But let me show you what I love:
 |
| the hand! I finally did it right, and left space for the dye to creep in! |
It is funny, because had this worked, I think I would have gotten it batik out of my system and moved on to something else, but as it is, I am inspired to keep trying. But something simpler! With lighter colors!
Sunday, July 1, 2012
Another month, another quilt
I am somewhat ashamed of my lack of updates, but I feel somewhat like I've been running flat out... anyway, enough excuses, and on to the quilt!
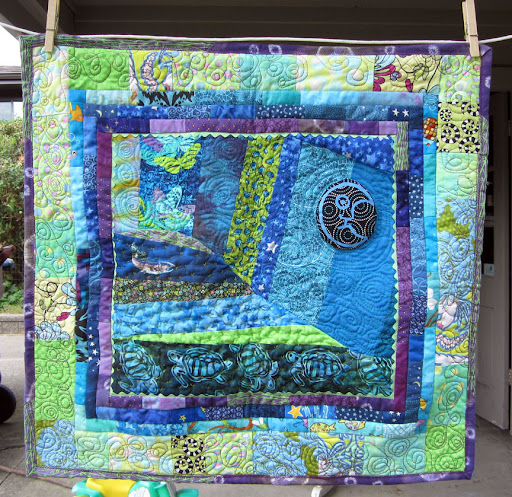
This is for my younger daughter's room. She had picked out the sea turtle fabric, and I had just had one technique for sewing curves for quilts explained to me. One brief sketching session later, I was off and running.
The moon is a screen print on top of a commercial print, a leftover from another project. There are also a few hand dyed fabrics, most notably the top left corner of the vignette (I don't know what you call it, the main part of the quilt, but not including the border?)
I tried a solid lime green border, and it was a no-go. So I went with scrappy in different colors, from darkest to lightest. The rick-rack came from Etsy, after a trip to the local fabric store yielded no lime green only something called "leaf green."
The sky and farthest reaches of the border were free motion quilted using a darning foot (and the parts where the thread tangled up are where I forgot to put that foot down!). The skinnier segments of the border were quilted in the ditch with a walking foot. The hill was quilted with embroidery floss by hand in little Vs. The binding is another attempt at doing an all machine binding, but I am still not entirely pleased with the results...that remains an area for improvement.
Of course, making a quilt for one child requires a quilt for the other. And that is not yet done. I did show it to her today, and her response was that I needed to hurry up and finish it, so that's positive, though, I can't, as I am dyeing some fabric for the border, and the rest I ordered, and has not yet arrived.
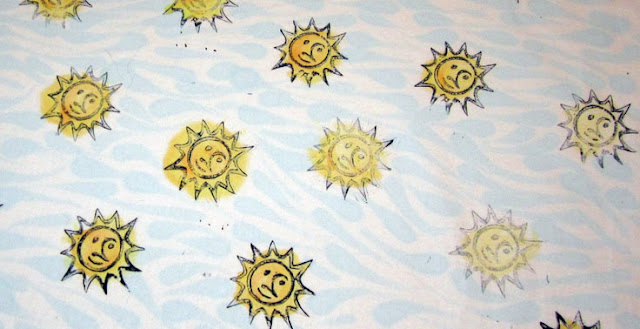
But I can show you a preview of one piece of hand stamped and painted fabric that's used in it:
[caption id="" align="alignnone" width="640" caption="sun fabric!"] [/caption]
I forgot until I was a bit into the carving of the stamp that the sun would, of course, when printed, be facing the other way! And yet I kept on, so it faces the wrong way... though, that doesn't seem to be a problem until you see the quilt. Also, had a bit of a problem inking it, but I still like the look, anyway, I only needed one good one.
I've just obtained a few transparent Setacolor paints, which I used here, and have been having an exciting time playing with them for a week or so, doing some sun painting as well as stamping and painting.
 |
| wall hanging for a green room |
This is for my younger daughter's room. She had picked out the sea turtle fabric, and I had just had one technique for sewing curves for quilts explained to me. One brief sketching session later, I was off and running.
The moon is a screen print on top of a commercial print, a leftover from another project. There are also a few hand dyed fabrics, most notably the top left corner of the vignette (I don't know what you call it, the main part of the quilt, but not including the border?)
I tried a solid lime green border, and it was a no-go. So I went with scrappy in different colors, from darkest to lightest. The rick-rack came from Etsy, after a trip to the local fabric store yielded no lime green only something called "leaf green."
 |
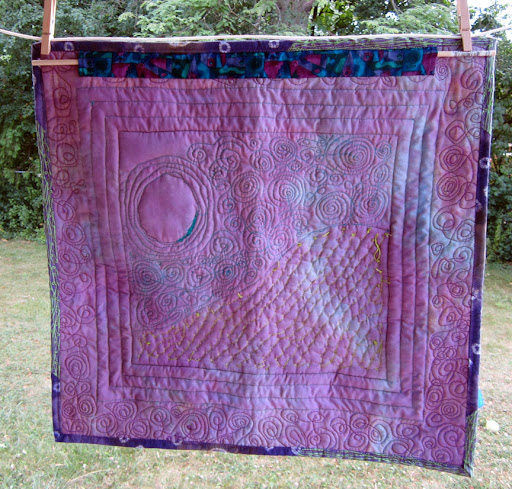
| and the back, which shows the texture of the quilting better. |
The sky and farthest reaches of the border were free motion quilted using a darning foot (and the parts where the thread tangled up are where I forgot to put that foot down!). The skinnier segments of the border were quilted in the ditch with a walking foot. The hill was quilted with embroidery floss by hand in little Vs. The binding is another attempt at doing an all machine binding, but I am still not entirely pleased with the results...that remains an area for improvement.
Of course, making a quilt for one child requires a quilt for the other. And that is not yet done. I did show it to her today, and her response was that I needed to hurry up and finish it, so that's positive, though, I can't, as I am dyeing some fabric for the border, and the rest I ordered, and has not yet arrived.
But I can show you a preview of one piece of hand stamped and painted fabric that's used in it:
[caption id="" align="alignnone" width="640" caption="sun fabric!"]
 [/caption]
I forgot until I was a bit into the carving of the stamp that the sun would, of course, when printed, be facing the other way! And yet I kept on, so it faces the wrong way... though, that doesn't seem to be a problem until you see the quilt. Also, had a bit of a problem inking it, but I still like the look, anyway, I only needed one good one.
I've just obtained a few transparent Setacolor paints, which I used here, and have been having an exciting time playing with them for a week or so, doing some sun painting as well as stamping and painting.
Subscribe to:
Posts (Atom)