-->

Wednesday, September 25, 2013

Making the Bag with precious Echino

I have decided to make some stuff from patterns.

I have gone a little big overboard recently with buying fabric, but also, I've had some stuff hanging around for a long time, and it's time to make some stuff!

This weekend I bought the Noodlehead Super Tote pattern:

A paper copy from Pink Castle Fabrics
And I was thinking - I have this Echino hanging around...

Quite literally hanging around.
And wouldn't those Dear Stella snails make a great lining?

Amazing, right?
The trouble is, you look at the pattern and it calls for half a yard of focus fabric for the front, and a yard of contrast fabric for the gusset. And, of course, I have half a yard of the contrast, and a yard of the focus, and I'm not actually cool with that idea.

So, I'm holding off on this bag. I actually have another yard of classic Echino on its way to me (from Country Fabrics and Quilting which you should totally visit, because they have some hard to find prints in their collection; also SuperBuzzy has a lot of prints from older lines - though I haven't ordered from them yet, also, there's always Etsy!) so I suspect this bag will still be happening soon. But I will use something less precious for the gusset - Essex linen, perhaps?

Did you get that I'm obsessed with Echino? I'm obsessed with Echino.

In the meantime I've made the 241 tote as I initially intended. It only takes a half yard of feature and contrast fabric! This isn't the first time I've made a bag, but it's the first time I've used a pattern to make a bag. There's a lot to learn, that I wish I'd known earlier. Especially about interfacing and linings (Sara of Sew Sweetness has a great post on bag interfacing if you need somewhere to start).

I had this fat eighth of bugs in my Echino scrap pile! So excellent.
Sadly, it's not actually big enough for all the stuff I feel need to cart around with me (looking at you, lunchbox!) So, I really do need to buckle down and make the super tote. Then I start to wonder... would it be weird if my 241 and my super tote had the same feature fabric? I do have a half yard of it left after all...  I think that carrot linen would make an excellent contrast. Or the lime green? hmmm....  I mean, it's not like I would be carrying both at once.

But what I really want to do right now is make another 241 tote! They're so fun! And I have just the fabric for it, too...

Sunday, September 22, 2013

And so on - more on scrappy plus blocks.

My big accomplishment this weekend was finishing cutting some pieces out of all my set aside fabrics for my Scrappy Plus quilt. I don't think I'm done cutting, just done with the first round. I wasn't counting while I cut, haven't counted what I cut before, will not be counting... at least not until they are finished blocks. Also, I will probably continue to buy new fabric for this quilt. It may never end. I bought one new one just today, actually.

Bags of 2" and 2.5" strips in front of the remains of the stack of fabrics.
I've been thinking about the process of making these blocks, while making these blocks, and though it appears from my last post that I make them one by one, that's not true. At least after that first block.

I do the first round sashing in groups of  5-8. Semi-chain piecing as I go; this cuts down on trips to the ironing board. I will always chain piece if I can help it. But I keep the group size small so that I don't end up with a confusing tangle of the extra sashing pieces, because I also don't want to be digging for stuff.

Sashing the first side.
After each side is attached, I press the blocks.
Then I lay the next piece on:

 I don't pin, 'cause I'm a cowboy.
Almost done!
 Then "square them up" (though they aren't square blocks).

Making sure to check it against my cheat sheet.
The whole group together:

Now the kids think we need to decorate the house with fabric.
For the second round of sashing, I do them individually, because I feel they then need my undivided attention. Or something may go wrong.

And here are all my finished blocks. I did not complete one today, well, not yet. The night is young!
 
So far there are eleven!

Wednesday, September 18, 2013

Work in Progress Wednesday: scrappy plus along quilt

I've got a few secret projects underway, which leaves me a bit puzzled as to what I can put up on the blog.

So, I'll share the other thing. I've been working on a Scrappy Plus quilt. I have been collecting coral and turquoise (or pink and orange and aqua and teal, not really any or all of them specifically) fabrics in hopes that a project would come along that could be a two colored quilt. This does work for that purpose, and so I've started some blocks.

I am using this tutorial from my friend Brenda from Just a Bit Frayed. Which she had posted to instagram, also flickr (from whence I lifted the picture).

My husband was a little upset that she referred to a 6x7" block as a square.
I would expand on these directions to say that you need about 36" of 2" wide strips, and 24" of the 2 1/2" strip for one block (less, probably, but I like to have extra rather than find out I'm short at the last moment).

Here is what I have done so far. I've cut most of my coral fabrics (though I've ordered some more), but only a few of the teals (or what have you) so they're not as scrappy as they will be. I'm hoping for 56 blocks for a twin (provided I did my math right....)  
It's either phone pictures or no pictures in the middle of the week.
While piecing my sixth block it occurred to me that the piecing could be easier in a slightly different order, demonstrated here:

Sorry, put this together on my phone in the middle of the night.
The upshot is that if you put half your internal sashing on before you cut, you save a little bit of the trouble of piecing tiny bits in the next step.

I hope some of you will consider quilting along on this one, it's really very fun, to make something, slice it apart, and make it into something that looks very different.

Linking up to WIP Wednesday at Freshly Pieced.

Photocollages courtesy of the Instacollage app on my iphone.

Sunday, September 15, 2013

A digression onto labels.

I finished it up my triangle last night, but still haven't signed/labelled it yet. I'm not certain what to do about that, really; I had made some labels via Spoonflower, but they're boring and only just adequate. And also too wordy. And I only have one left anyway. So, it's time to rethink.

Here's my boring label applied to a recent quilt.
So, while I need to ponder that, having the quilt quilted and bound... It's a bit late for this discussion.
Because it should have been labeled already.

I generally attach my label before I baste - with iron on adhesive: I use Pellon Wonder Under 805, but any medium or light weight one will probably do. Sew it down to the back (I just sew regular straight stitches, close to the edge) then baste the quilt together as usual, so that when you quilt, you are quilting on top of the label - giving it a third reinforcing and making it more of a part of an organic part of the quilt. That's my rational anyway. Also makes it super hard to remove, in case someone wants to steal it and claim it as their own. It's hard to imagine, but it does happen.

This one time I pieced the label into the back, which is a cool thing to do with a cloth label:

Which is awesome.
But I don't generally piece my backs - mostly I'm doing whole cloth or one seam backs.

Having not attached on the label pre-basting this time, once I do decide on a label, I'll have to reinforce the adhesive with hand stitching, which is not my favorite thing to do. Unless I write on the quilt. Which is an unnerving idea with my horrible handwriting.

 So, in this moment of indecision I've been looking at other people's solutions:

I got really excited about the dog that Adrianne from On the Windy Side used to label a recent baby quilt:

quilt label picture
photo courtesy of Adrianne of On the Windy Side
The other option I adore is screen printing. Rossie labels hers with just her company name and the year completed:

Photo courtesy of Rossie Hutchinson
It's like branding a quilt, not in the modern sense but the cowboy sense.  Also I just love screen printing and having the ink already I should just do this and order a thermofax screen made for me. Once I decide what to put on it, or course.

But what do you put on a label? Mine have washing instructions and material used, which would be useful if I'm going to sell them but I don't actually expect to sell them. Though I think washing instructions are kind of necessary if you are giving it as a gift, too. But most of mine seem to be sticking around my house, and I know how to wash them.

Rachel at ps i quilt does handwritten labels:

photo courtesy of Rachel Griffith
These are attached fairly similarly to mine. I think these are adorable in their simplicity, and also have the bonus of letting you choose what pieces of the million pieces of information about construction and intent to include on the quilt. But being handwriting challenged myself, I'd have to find someone to help me out if I went that route, so it's not likely to be sweet and personal for me.

Christine Doyle presents a wide variety of label options in this post. Including embroidery, which is an option I am not prepared to consider myself. But I really dig the look of those computer printed tabs!

I love Katy Jones's labels from Spoonflower:

photo courtesy of Katy Jones
Like me, she's included washing instructions, and she discusses whether or not to date them. I believe dating them is important, for the history of the quilt, after all someone may want to know that. But probably putting down the day of the last stitch as I did on those two above is overkill.

Lostquilt.com has a long list of suggestions of what is necessary by way of label should a quilt go wandering off into the world. I like the city and state suggestion, but would balk at including my whole address. The thing is, I'm web searchable! I feel like people could find me if they need to.

So, I guess I'm just going to marinate on this for a bit, trying to combine legitimate information with an adorable animal... leaving space for an appended date, something that can pieced or printed, something that will work for all foreseeable situations, and hopefully come up with something I can be happy with for a while. That's not at all a tall order, right?

Monday, September 9, 2013

The triangle quilt: revealed!

Though, honestly, if you follow me on instagram, you have probably already seen all that there is to see of this quilt. (And see it with cats rolling on it while I was trying to baste it!) And I've already posted about it twice here. Once to share my fabric choices and the other time to talk about how to put one together.

My baby is growing up and as soon as we're a bit more settled into our school routine (and my husband's new job calms down!) we will be getting her a new big (well, twin) bed. So, a new bed needs a new quilt!

Thank you, Brenda, for taking the picture!
 I have actually never held a quilt up for photographs before, it's actually quite exhausting. Especially on a windy day when you have to wait for a still moment for a picture. Also, it is wider than my arm span (at least with my arms over my head) so we lost the corners, and taller than me, so I'm actually standing on a chair.

And a close up.
I just did straight line quilting.  I dug out my old Janome because I like it's old fashioned giant walking foot better than the Pfaff's integrated one. I just feel like my Pfaff pushes everything together too hard, and ends up trapping wrinkles more often than the more relaxed Janome. I used the size of the foot to determine the distance from the seam of the stitched lines, but since the foot is off center (or the needle is?) they are not the same on either side of the line. But, it's cool.

And a binding and backing shot.
For binding I used Lucie Summers's Track print from Summersville Spring. I think it works amazingly well with these fabrics. I was hoarding it intending to bind another quilt with it, so I guess I'll be buying more! The back is one of the 108" spot on from Robert Kaufman. I think the color works with the front, and this child has no problem with pink, and it saved me a bit of money.  Initially I was thinking about one of the purple prints from 1001 Peeps that Pink Castle Fabrics has on sale now, but despite my devotion to Lizzy House, I believe this was a better choice for this quilt. Also I couldn't decide between the people and the city print, so I *had* to choose a third option.

I did a different sort of binding than usual. I did a single layer binding so that it would be wider without requiring more fabric than I had; I only had a half yard. I have not worked out how best to attach it on machine (everyone hand binds! it's hard to find much to go on if you can't.) so I'm not going to talk about my technique, though it is adapted from the one Lynn Harris showed us at the Ann Arbor Modern Quilt Guild meeting last July. But I really like the look of the thicker binding! Even if this one could have been applied better.

Thursday, September 5, 2013

Butterfly dress!

My elder daughter just turned seven (gasp) and I made her a dress from this precious Lizzy House fabric*. (Let me tell you how excited I am that there will be new versions of this print. So. Very. Excited.) We tried to have a photo shoot.

There was a lot of trouble with the fans.
It turns out that Emily made a dress from the same fabric for her daughter (I believe it's a geranium) so I borrowed it for my own other child so that she would coordinate.

So, I don't usually do kid pics. Firstly, I am uncomfortable with showing them off to people I don't know, and secondly, they are too wiggly and always asking to see the pictures, and much like me, can't follow directions, so I gave it up after twenty minutes. So, let's see it off the child:

And you can see the super sweet lining fabric!
This dress is Butterick 3714, veiw B (no cowl, no sleeves). And the 7 fit her without adjustments. So, I'm happy with that! I did a fully lined bodice, but did not line the skirt. I drew out the pattern using the skirt lining length as the skirt length (the pattern is for a tea length dress - which would not be something this child would wear) because I did not have that much fabric. I was worried that it would end up too short, and would need a contrast band (hence the piping (the same butterflies, but in coral), which was laying the groundwork if that eventuality arrived, since the band would have been that coral fabric again), but this is a great length, so I didn't.

I used the super seam #2 from Made by Rae's fantastic tutorial, which is probably overkill on a dress. But I had (still have) loads of trouble with unraveling seams from the dragon dress, so I'm much more conscientious about that now. I machine sewed the lining to the bodice proper, rather than hand stitched it (and I did that as well on the dragon dress after having to re-stitch the hand stitching on it 2 or 3 times) so that there is no way they will come apart. I don't care that you can see the stitches (and actually, it's not that noticeable) but I feel confident about it not coming apart in the washing machine, which is much more important to me than outward perfection.

I like the two butterflies side by side on the back - totally an accident!
I thought the pattern was fine, I would totally make this one again. But maybe I lucked out with my child being just the size for it without alteration. I am only sad about the zipper... which could have been done better (it's a tiny bit skewed). And, honestly, I thought the pattern directions for installing the zipper were extremely unhelpful (and possibly impossible to follow). But being able to install a zipper neatly will be a skill that will come with practice, at least, I hope so. Also, I couldn't figure out a good way to protect those seams with the confusion of an added zipper, and just ended up pinking them.

The next dress is going to button up... I need a break from zippers!

I worked on this at the SE MI crafty meet up, and got a lot of good advice from the other sewists there, I am not the most confident seamstress around, especially with my precious Lizzy House fabric. I'd like to thank Karen LePage especially for her input and hand-holding.

Her advice was: cut out the bodice and sew it up, and then decide whether or not you have enough fabric for the skirt. And I decided it by making scrap paper skirt pattern pieces and cutting them down (up?) at the hem until I could fit all four of them onto the fabric.

Not that I would make a bias-cut skirt out of so definitely vertically patterned fabric.
And finished with a blind hem! I measured the hem with my Dritz EZY-hem Gauge, an amazing metal ruler (straight on one side, curved on the other) you can iron on. I do hate hemming above every other tedious thing that sewing sometimes involves, but this makes it much less painful than juggling those sliding rulers was.

*From Hello, Pilgrim. I think I got this fabric from Fabric Shack, but they aren't carrying it now. It takes me a while from fabric purchase to final product... 

Monday, September 2, 2013

The wasteful star, or how precut pieces caused me to discover a completely useless, but novel, way to piece flying geese

I am calling this a "Tricknique."

Wasteful star!
A long, rambling introduction, first! So, I have a sizzix Big Shot for cutting fabric. When I first got it, I bought four dies: tiny quarter square triangles, 2.5" squares, and the two dies you need for drunkard's path.  Recently, I acquired a half square triangle die (the 5" finished square one), and cut out a bunch of half square triangles for my back burner quilt, which I'm not really going to talk about, but it has stars on it, and when it came to piecing one...

Maybe do I have to talk about the quilt? It has been hanging out for a while, and keeps being pushed back behind every new project, and while there is a good reason for that (several, probably?)... but there is one really good reason that I can't do most of the cutting now, which is that I don't want to do it by hand, so I am waiting for sizzix to relist a die that is currently out of stock (and I have talked to them, and it will be available eventually, but! the! wait! is! hard!) And I feel sad about the project that I was so excited about become less and less exciting the more it's shoved into the corner.

So, starting this week, I've been putting a little work into it, hand cutting a few pieces here and there (mostly, it's the border that will require the die) to see some progress and to remind myself how awesome this will be when finished (even if that is a long time from now).  I've also cut many quarter and half square triangles using my sizzix, for quarter square and half square blocks, and I totally realize this would make a ton more sense with pictures... but that's not happening, I want to save this quilt for the big reveal.

I decided to make one whole block, and it involves a star,* so I looked at my scrap pile, and my squares and my piles of triangles, and thought, hey, I can just piece the arms of this out of triangles! Because I cut so many triangles, many more than I will ever need (unless I make three of these quilts), because I totally love! love! running fabric through my Big Shot.

And after I pieced like five of these, I realized what I was making were flying geese, and I thought probably no one pieces flying geese like this, and I'm not sure why you would, except if, like me, you had a surfeit of various triangles to start from.

In case someone does need to, here's a tutorial on Wasteful Star:

materials
You will need: 8 quarter square triangles (finished size 41/2") - 4 in the outside color, and 4 in the inside color, 1 4 1/2" center square, 4 2 1/2" corners blocks, and 4 large half square triangle blocks (these are 5" finished, but, you could use any size that gets you past the seam allowance. Which means it must be at least somewhat larger than your quarter square triangle.

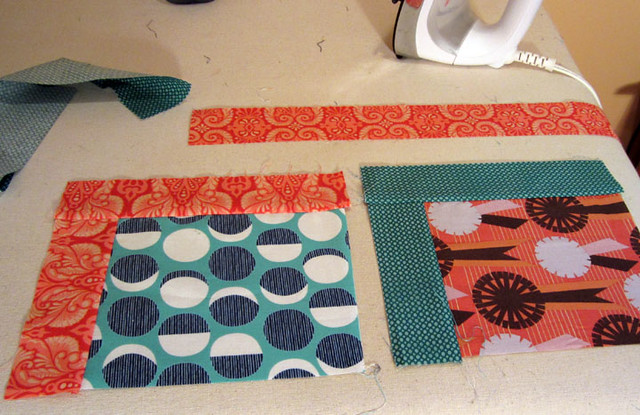
1. piece your quarter square units, each to its opposing color. Press.


2. piece your half quarter squares to your half squares. Press. Because mine is larger, it doesn't matter which side I line it up with when I sew it; the excess will be cut off later. But if yours is smaller than the half quarter triangle, you need to match the orange side, okay?
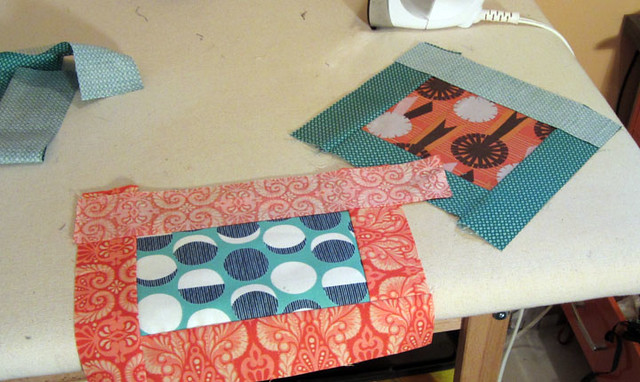
Before trimming.
3. Trim the units down to 2 1/2 x 4 1/2".  Line your ruler up on the base of the orange triangle, and you should cut 1/4 past the point. Now you have geese!

A goose appears!

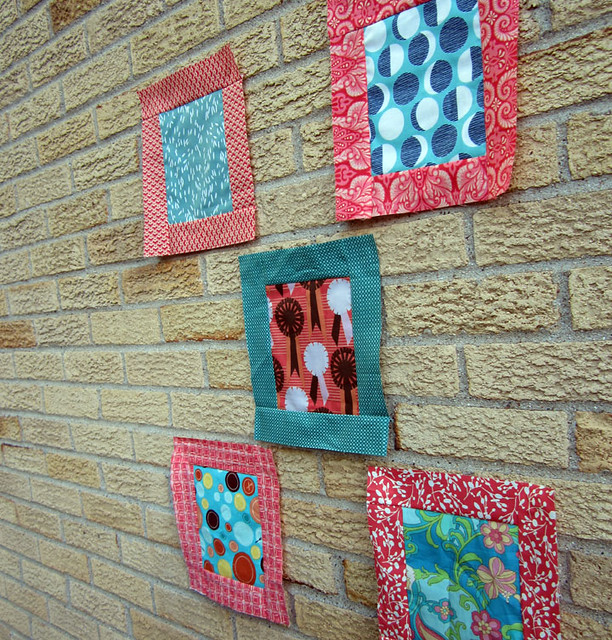
4. And assemble your block from there.  It's an 8 inch star, when finished.

At the bottom are the cut off pieces.
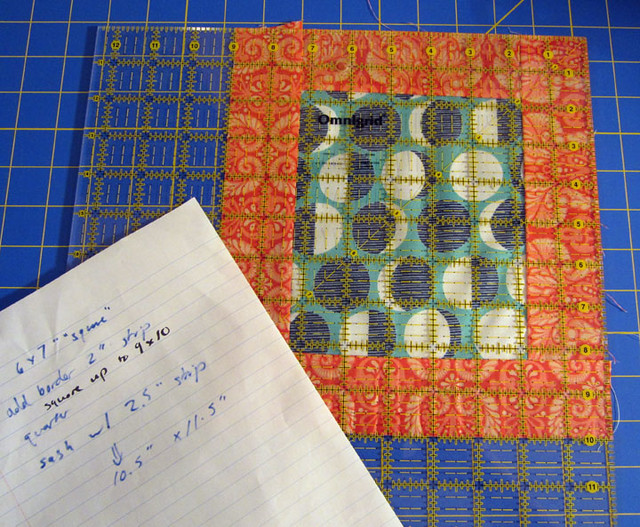
I've been cutting my scraps into 2" squares to piece a 6" version of the same star, for which I will make flying geese in a less ridiculous manner, so maybe it is not so wasteful after all?

* I don't know if this star has a name. I think of it as "the basic star." It is at least the basis of or a  variation on the sawtooth star.

*** Edited to add: here is a much more sensible approach for die cut geese from VeryKerryBerry.