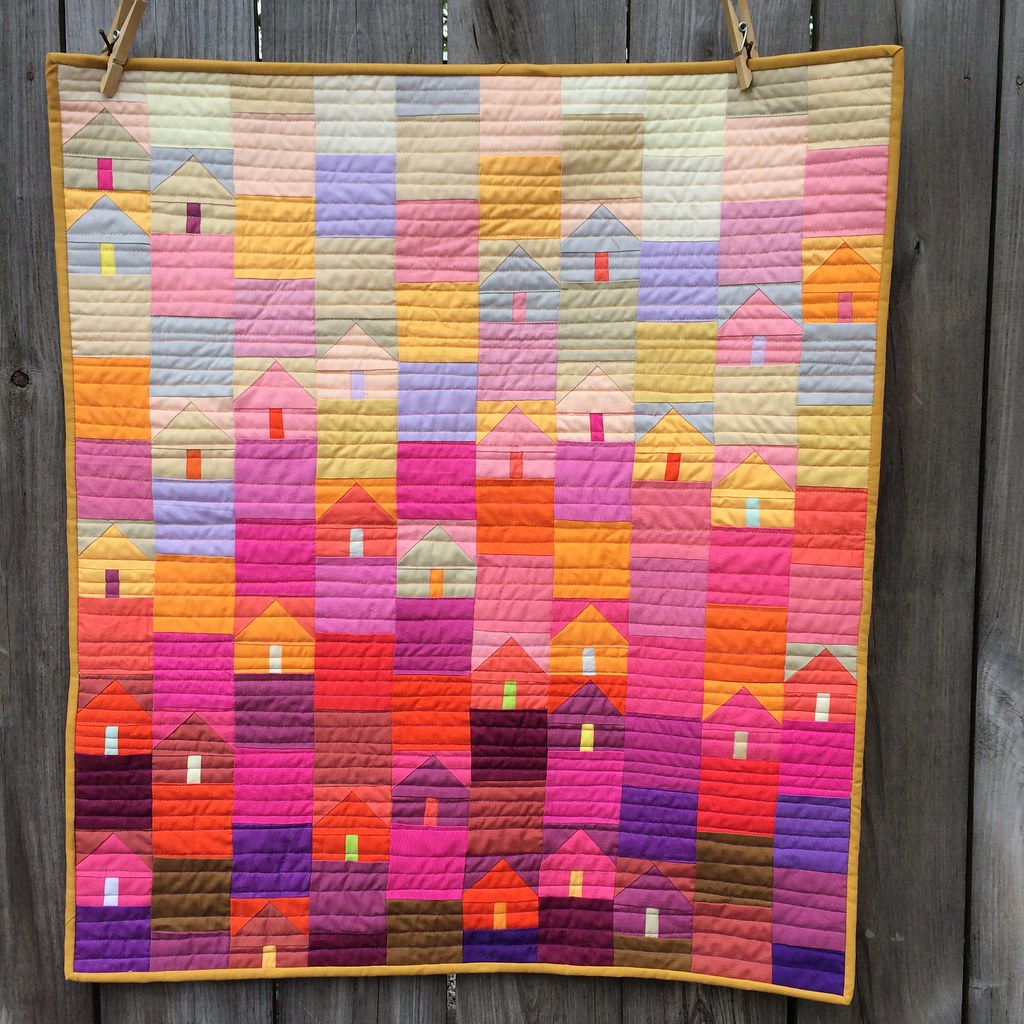
Presenting One Third Street Neighborhood! (Not #1 Third Street, but 1/3 Street!) I have long admired Debbie Grifka's adorable Third Street Neighborhood pattern. But I wanted many more houses (so I could do three layers of color) in less space (because I love tiny pieces). Her large version (20 houses) is a lap sized quilt. My version has 32(?) houses and is 26"x30".
So, how did I make the quilt?
Step one - I bought the pattern. I also asked permission to blog about it, because I knew I would be doing something a bit radical to it. Debbie graciously agreed!
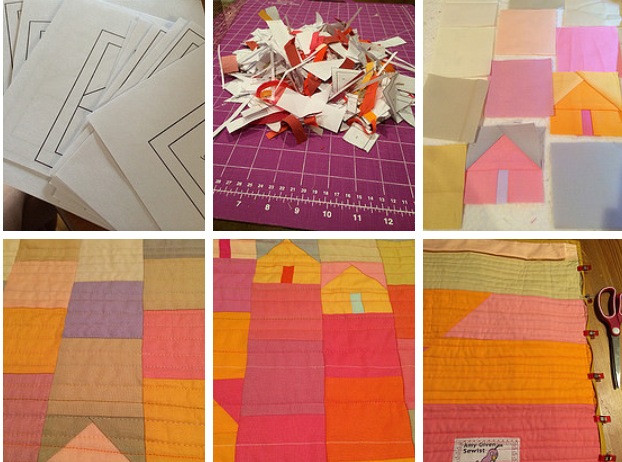
Step two - I studied the pattern, drew out the block, and used Adobe Illustrator to build the house block as it was written (without seam allowances), then shrank it down to about 1/3 the size, then added back the seam allowances.
Step three - paper piecing all the houses. Because I had three rows, I did darker houses, medium houses, and light houses, because I wanted to go light to dark.
Step four - using the pattern as a reference, I began to place houses. I have more houses than the pattern though, so for some of them, I had to extrapolate from the pattern.
Step five - filling in the blank blocks. This took a long time. This quilt was hung on the design wall for a few weeks, where every now and then I would look at it, and move things around. I didn't want colors touching themselves, or colors that were too similar. I ended up adding in a few more purples and that deep burgundy at the last minute, and several colors were banished (red, white, and a certain shade of pink). Most of the colors I used are leftovers from other projects, or fabrics I had hanging around. Nothing was specifically bought for this quilt.
Step six - assembly. I decided not to worry that they don't line up. Because they don't. And it would have taken too long to figure out why.
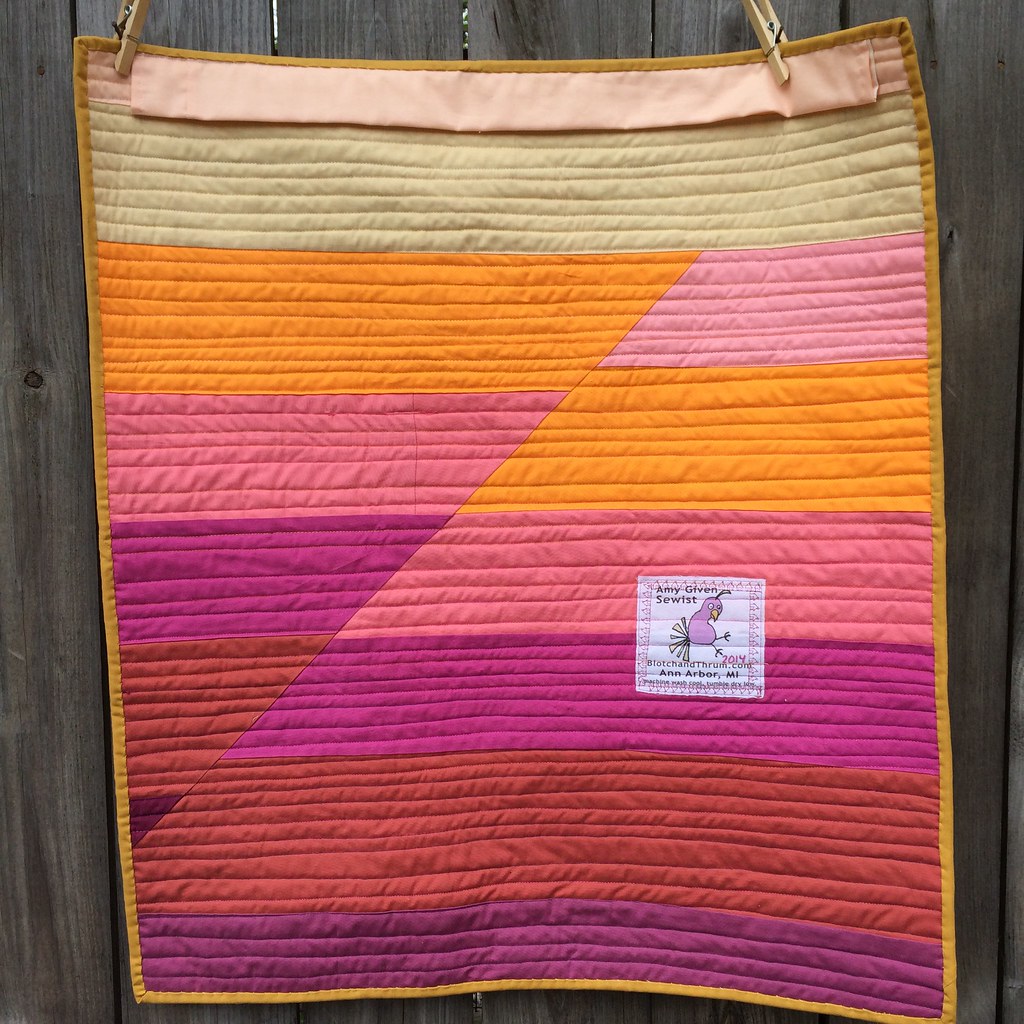
Step seven - the back! I did stripes in some of the colors from the quilt. One's I had a lot of, mostly. There was supposed to be a cream stripe too, but clearly I miscalculated the size I needed, and it all got cut off. I sliced the assembled stripes partway through and offset it so that it would be more interesting. Then I basted it, realized I never put my tag on it, removed the basting, and added the tag, and then basted it again.
Step eight - quilting! I went with threads of different colors in straight line quilting across the quilt. I used my Janome and it's walking foot. I thought this was the best way to get dark colors down at the dark side, and light colors at the top. I did cheat and use poly thread for many of the lines, because the two quilting stores I went to only had a few shades of 40 weight thread between them, and while I know the other local quilting store would have been better stocked, I was trying to finish for today. It's a wall hanging, we'll survive...
Step nine - binding! I chose an RJR solid in Golden Topaz, because I believe (like denim blue and most shade of green) that mustard yellow goes with everything. And I had some leftover from another quilt. I hand stitched it, mostly because my Pfaff is in the shop for cleaning, and my Janome doesn't have anything fancier than a zigzag stitch.
And all that's left now is to stitch down the hanging sleeve.
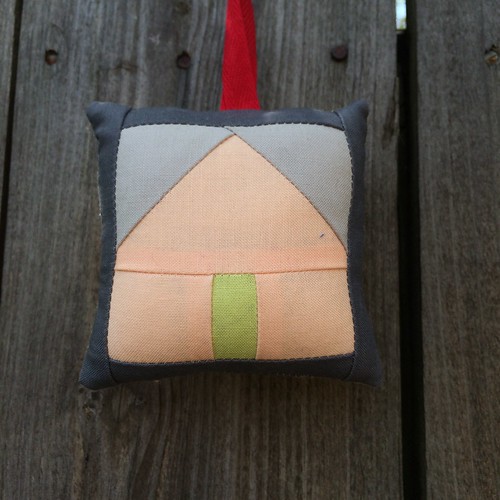
As for the extra houses (I made 36), I made a double sided pin cushion from two of them, inspired by the Ann Arbor MQG's recent pincushion swap. I'm not entirely sure it won't explode, it's so stuffed.
 |
| The picture of the other side was not so great. |
Amy, this is totally fantastic! I love love the color transitions from light to dark. I can't believe how small those houses are - they are adorable! Thanks for linking up with Sew Solid Sunday.
ReplyDeleteI'm glad you like it, Debbie!
DeleteGorgeous! Thanks for sharing your process with us.
ReplyDeleteThank you! My pleasure!
DeleteI love this quilt! the colors are so eye catching~just up my alley! I adore the back too! So well done!
ReplyDeleteThank you!
DeleteWhat a great adaptation of debbie's quilt. I love the color scheme.
ReplyDeleteThanks! I was just thinking about dawns and sunsets, though now that I look at it, it may be sort of upside down. hmmm. maybe I'll have to make the inverse of the quilt.
DeleteI love this quilt, especially the shift from dark bottom to light top and the color from purple to pink to blue+white--for a feeling of sky. I too put blocks up and move them around till the colors are just right. it is a fun way to work. Also, I think patterns are made to be modified. Like recipes. I found my way via Sew Solid Sunday (but I don't have anything to show this month).
ReplyDeleteThank you! Yes, life has changed since I got a big design wall. Much more ability to play with colors. On the other hand, it does make quilts take longer to produce, now that I can think about the layout more.
DeleteThis is totally amazing! I'm in love with the colors and houses. It feels like spain or italy or even socal. LOVE!!!
ReplyDeleteThanks! I was thinking Italy, sort of. I haven't been, but I've seen pictures. :D
DeleteLove hearing abut your process. The end result is stunning.
ReplyDeleteFunny because it makes me think of somewhere in Scandinavia!
Thank you! I'm very happy with it.
DeleteThis is stunning- did you use regular cottons or shot cottons? I absolutely love it.
ReplyDeleteRegular cottons, though they are from several different brands, so there is a variety of finishes - michael miller's cotton coutures and soho solids are thinner and shinier, for example, while RJR cotton supremes are much more thick and matte... Kona and Bella are somewhere between those extremes, I think. If that makes sense?
DeleteGorgeous! I love what you did to the pattern and I love the colour palette. Great work!
ReplyDeleteThis is wonderful. I love how the house lights seem to be twinkling as dusk falls.
ReplyDelete